Tuesday, November 28, 2006
Thanksgiving Recovery
I'm still stuffed. Turkey and some of the fixings still remain in my fridge. With the mashed potatoes dusted and the stuffing almost gone, I decided to make use of the leftover turkey in a thrown together egg noodle casserole. Freshly diced onion and celery with a bit of minced garlic flavored the left over gravy-based sauce. A few dried herbs added flavor as I had no fresh herbs left after Turkey day chefing and have stayed away from the market due to our full fridge. A generous addition of freshly cracked black pepper finished the dish and we gobbled down our Thanksgiving day turkey as if we hadn't been eating it for the last 5 days.


Thursday, November 02, 2006
Thanksgiving "Covered"
It's November already and I keep thinking "what happened to 2006?" Time seems to go by much faster as you get older. I think that's because one year when you are 32 is 1/32 of your entire life, while one year when your are 6, is 1/6 of your entire life, and probably 1/4 of your memorable life so a year seems like an awfully long time.
2006, however, is not yet over and the holidays leave plenty of opportunity to make the year a memorable one. With the passing of Halloween, our thoughts turn to Thanksgiving, which for those of us who enjoy cooking, means thoughts of that perfect turkey brine from an old Bon Appetit, my mom's stuffing, and my very own homemade pie. Oh, and of course, homemade turkey gravy to top it all off. Except the pie of course, for that, we'll use homemade whipping cream. No Cool Whip allowed. Isn't that what Thanksgiving is all about? Topping it all off with real wholesome fat devoid of any commercial stabilizers or ingredients extracted from corn in a laboratory? Click on the words Cool Whip to read the ingredients. The second one is corn syrup, the third is hydrogenated vegetable oil, oh, and the first one: WATER.
If you've read this blog in the past, you'll know that I like to start my dishes from as close to scratch as possible, so when we went to the Petaluma Pumpkin Patch to scout out some jack-o-lanterns for Halloween, I picked up a Red Kuri squash, which the people at the pumpkin patch indicated would make a phenominal pie. I bought the Red Kuri squash in anticipation of finding a better alternative to pumpkin for my Thanksgiving pie. My mom's been using squash for her "pumpkin" pie for years, although I'm not sure which kind. I split the squash, seeded it, and cut it into wedges. I then peeled the skin, covered the wedges with cold, salted water in a 4 quart pot and brought it to a boil. It only took about 10 minutes of cooking before the squash was ready. I drained the wedges and kept the lid off the pot allowing the excess water to evaporate so the squash wouldn't seem water-logged. I put the squash slices in a food mill, processed it into a smooth puree and measured it for my pie recipe. Unfortunately, the pie turned out a bit more dense than I would have liked, so if I were to try it again with the Red Kuri squash, I will use slightly less of the puree. Next time, however, I'm going to try some sweet pumpkin. I'll let you know how that turns out, but we first need to eat up the squash pie.
Dense as it is, the pie seemed to be pretty tolerable with a little homemade whipping cream... No I didn't milk the cow, but I did buy some high quality Clover brand cream. It's more important than you think to have good quality cream to top your pie. For those in the bay area, Strauss is a great option as well, but a bit more expensive.
I like to make just enough topping for a few slices at a time, and I thought making whipping cream was a great excuse to get Lou in the kitchen. (He likes instant gratification.) I poured 1/2 cup of cream into a small mixing bowl, added a dash of vanilla and 1 Tablespoon of sugar, and directed my apprentice to put the beaters into the hand mixer, this time making sure they were in all the way by listening for the "click". (The first time he tried using it just a few months ago, the beaters flew right out of the mixer when he turned it on and of course he was holding it up, out of the bowl, so they flew across the kitchen.) I then instructed him to beat the whipping cream. He started beating and about 5 seconds into the process, asked me when we add the eggs. I waited a few seconds and the whipping cream told him the whole story. I indicated that was it, and Lou was amazed by the simplicity of combining three natural ingredients to make a delectable dessert topping. For those Cool-Whip users out there, I implore you-turn to the real thing this year.
2006, however, is not yet over and the holidays leave plenty of opportunity to make the year a memorable one. With the passing of Halloween, our thoughts turn to Thanksgiving, which for those of us who enjoy cooking, means thoughts of that perfect turkey brine from an old Bon Appetit, my mom's stuffing, and my very own homemade pie. Oh, and of course, homemade turkey gravy to top it all off. Except the pie of course, for that, we'll use homemade whipping cream. No Cool Whip allowed. Isn't that what Thanksgiving is all about? Topping it all off with real wholesome fat devoid of any commercial stabilizers or ingredients extracted from corn in a laboratory? Click on the words Cool Whip to read the ingredients. The second one is corn syrup, the third is hydrogenated vegetable oil, oh, and the first one: WATER.
If you've read this blog in the past, you'll know that I like to start my dishes from as close to scratch as possible, so when we went to the Petaluma Pumpkin Patch to scout out some jack-o-lanterns for Halloween, I picked up a Red Kuri squash, which the people at the pumpkin patch indicated would make a phenominal pie. I bought the Red Kuri squash in anticipation of finding a better alternative to pumpkin for my Thanksgiving pie. My mom's been using squash for her "pumpkin" pie for years, although I'm not sure which kind. I split the squash, seeded it, and cut it into wedges. I then peeled the skin, covered the wedges with cold, salted water in a 4 quart pot and brought it to a boil. It only took about 10 minutes of cooking before the squash was ready. I drained the wedges and kept the lid off the pot allowing the excess water to evaporate so the squash wouldn't seem water-logged. I put the squash slices in a food mill, processed it into a smooth puree and measured it for my pie recipe. Unfortunately, the pie turned out a bit more dense than I would have liked, so if I were to try it again with the Red Kuri squash, I will use slightly less of the puree. Next time, however, I'm going to try some sweet pumpkin. I'll let you know how that turns out, but we first need to eat up the squash pie.
Dense as it is, the pie seemed to be pretty tolerable with a little homemade whipping cream... No I didn't milk the cow, but I did buy some high quality Clover brand cream. It's more important than you think to have good quality cream to top your pie. For those in the bay area, Strauss is a great option as well, but a bit more expensive.
I like to make just enough topping for a few slices at a time, and I thought making whipping cream was a great excuse to get Lou in the kitchen. (He likes instant gratification.) I poured 1/2 cup of cream into a small mixing bowl, added a dash of vanilla and 1 Tablespoon of sugar, and directed my apprentice to put the beaters into the hand mixer, this time making sure they were in all the way by listening for the "click". (The first time he tried using it just a few months ago, the beaters flew right out of the mixer when he turned it on and of course he was holding it up, out of the bowl, so they flew across the kitchen.) I then instructed him to beat the whipping cream. He started beating and about 5 seconds into the process, asked me when we add the eggs. I waited a few seconds and the whipping cream told him the whole story. I indicated that was it, and Lou was amazed by the simplicity of combining three natural ingredients to make a delectable dessert topping. For those Cool-Whip users out there, I implore you-turn to the real thing this year.
Tuesday, October 17, 2006
The Wolfberry
I'm taking a class on Monday nights at SF City College called "Food and Culture". We make foods of a different ethnicity every week. A couple of weeks ago, our teacher passed around a small plastic bag containing a little known berry and said we could write about it for extra credit. It was called the Wolfberry. It inspired me to write the following:
Upon sight of the pale red dried Wolfberries that were passed around in class, I felt a familiarity for the specimens. I knew I had seen them before, but couldn’t recall the time or place. Upon finding them in Wikipedia and discovering that they are also know as the “Chinese Wolfberry, Duke of Argyll’s Tea Tree”, it dawned on me. I knew exactly where I had seen the nutrient rich berry- it was in the tea of so many locals I met in Shanghai on a recent trip. Most notably, a hard working older gentlemen who drove a bicycle powered rickshaw. The rickshaw must have been 50 years old and heavy in its own right. The man looked to be over 60. With the added weight of my 200 pound husband plus me (weight undisclosed), the skinny, seemingly malnourished man strained to pull us. At one point, uphill, across a busy boulevard, he had to get off his bicycle to walk the rickshaw. I wanted to get out and push, but he would not let us. I suppose it was his only way to make a buck. If he had been able to read Chinese characters, he would have taken us to the nearby silk museum, but instead, he pedaled us way across town to a silk factory. He offered to take us back after he realized that was not where we intended to go, but we couldn’t bear to see him struggle to pedal us again. Little had I known at the time about the power of the Wolf berry…perhaps I should have taken that ride.
The Wolfberry, also known as Goji berry or Tibetan Goji berry, and Frutus Lychi (as it was named on the package I bought from May Wah), can be eaten raw or cooked. It is often used in tea, as I had witnessed in Shanghai, and in soups. They are rich in nutrients such as beta-carotene, lutein, and lycopene; contains vitamins C, B1 and B2 to name a few, and contains more than 30 essential and trace minerals, antioxidants, and amino acids. It is known in Traditional Chinese Medicine to boost the immune system, eyesight, sperm production and improve circulation among other benefits.
I found the Frutus Lychi at May Wah sold by itself in the aisle with other dried foods and in packages combined with dried mushrooms, herbs and bark that appeared to be herbal elixirs. (There was a tea pot on the package showing that you needed to steep the mixture) I would have purchased one of these, but there was no way of knowing what the desired remedy was, and I feared an unwanted result. I tried adding the plain Wolfberry while steeping my green tea, but didn’t notice any obvious added flavor. When eaten, it seemed drier than a raisin with a similar fruity taste, but not nearly as sweet. Considering the nutrient content alone, I think I will continue to add the Wolfberry to my teas and perhaps at an old age I too will have the strength to pull two heavy Americans around on a rickshaw.

Here's a picture taken from the rickshaw of the poor Chinese man who struggled to pull us.
Upon sight of the pale red dried Wolfberries that were passed around in class, I felt a familiarity for the specimens. I knew I had seen them before, but couldn’t recall the time or place. Upon finding them in Wikipedia and discovering that they are also know as the “Chinese Wolfberry, Duke of Argyll’s Tea Tree”, it dawned on me. I knew exactly where I had seen the nutrient rich berry- it was in the tea of so many locals I met in Shanghai on a recent trip. Most notably, a hard working older gentlemen who drove a bicycle powered rickshaw. The rickshaw must have been 50 years old and heavy in its own right. The man looked to be over 60. With the added weight of my 200 pound husband plus me (weight undisclosed), the skinny, seemingly malnourished man strained to pull us. At one point, uphill, across a busy boulevard, he had to get off his bicycle to walk the rickshaw. I wanted to get out and push, but he would not let us. I suppose it was his only way to make a buck. If he had been able to read Chinese characters, he would have taken us to the nearby silk museum, but instead, he pedaled us way across town to a silk factory. He offered to take us back after he realized that was not where we intended to go, but we couldn’t bear to see him struggle to pedal us again. Little had I known at the time about the power of the Wolf berry…perhaps I should have taken that ride.
The Wolfberry, also known as Goji berry or Tibetan Goji berry, and Frutus Lychi (as it was named on the package I bought from May Wah), can be eaten raw or cooked. It is often used in tea, as I had witnessed in Shanghai, and in soups. They are rich in nutrients such as beta-carotene, lutein, and lycopene; contains vitamins C, B1 and B2 to name a few, and contains more than 30 essential and trace minerals, antioxidants, and amino acids. It is known in Traditional Chinese Medicine to boost the immune system, eyesight, sperm production and improve circulation among other benefits.
I found the Frutus Lychi at May Wah sold by itself in the aisle with other dried foods and in packages combined with dried mushrooms, herbs and bark that appeared to be herbal elixirs. (There was a tea pot on the package showing that you needed to steep the mixture) I would have purchased one of these, but there was no way of knowing what the desired remedy was, and I feared an unwanted result. I tried adding the plain Wolfberry while steeping my green tea, but didn’t notice any obvious added flavor. When eaten, it seemed drier than a raisin with a similar fruity taste, but not nearly as sweet. Considering the nutrient content alone, I think I will continue to add the Wolfberry to my teas and perhaps at an old age I too will have the strength to pull two heavy Americans around on a rickshaw.

Here's a picture taken from the rickshaw of the poor Chinese man who struggled to pull us.
Thursday, September 28, 2006
One Last Attempt
Lou and I made one last attempt to get more soup into the steamed pork dumplings by using another form of solidified liquid-ice. Perhaps if it had been frozen soup stock, it would have worked, but a small cube of ice seemed to dilute the flavors of the aspic too much. We also can't deny that the solid form of liquid as ice is no replacement for aspic. As we were working on consecutive buns, the ice rapidly melted in those that were waiting to be steemed, impermeating the dough of the buns and compromising their form, while aspic, which is not solid, but jelled, at refrigerator temperature, only "melts" into a liquid when heated by the steam.
While trying to solve the problem of too little liquid, we also worked on the dough itself. We determined that Yank Sing's dough was rolled to a thickness that was half that of our own. We therefore took great pains to roll our dumplings so thin they were almost transparent. The dough luckily was quite easy to work with so we had no problems with breakage. Even Lou was able to handle it with ease.
To summarize our conclusion, we like the flavors of the recipe for Shangai Steamed Soup Buns from the February, 2005 issue of Gourmet, which can be found on epicurious.com. However, the next time we make them, we will double the amount of aspic, halve the amount of the meat filling, and use less dough than prescribed for each dumpling. Then we'll roll it as thin as is humanly possible, thin and delicate enough to pop in your mouth, alowing the soup to flow.
While trying to solve the problem of too little liquid, we also worked on the dough itself. We determined that Yank Sing's dough was rolled to a thickness that was half that of our own. We therefore took great pains to roll our dumplings so thin they were almost transparent. The dough luckily was quite easy to work with so we had no problems with breakage. Even Lou was able to handle it with ease.
To summarize our conclusion, we like the flavors of the recipe for Shangai Steamed Soup Buns from the February, 2005 issue of Gourmet, which can be found on epicurious.com. However, the next time we make them, we will double the amount of aspic, halve the amount of the meat filling, and use less dough than prescribed for each dumpling. Then we'll roll it as thin as is humanly possible, thin and delicate enough to pop in your mouth, alowing the soup to flow.
Wednesday, September 27, 2006
Getting the Soup into the Buns
After our recent defeat in the Dim Sum arena, Lou and I decided we needed to invest in more R&D so we went to Yank Sing for lunch. We of course ordered two steamer baskets of the Shanghai pork dumplings and began our analysis. Immediately, we realized we just didn't have a large enough aspic to pork filling ratio. There was an abundance of broth with a very small amount of pork. I'm not sure why I didn't do the calculation earlier. Sometimes it's best to fully analyze a recipe's ratios before trying it out. In this case, the 1/2 cup of aspic, which admittedly sounded low, equates to only 1 teaspoon of broth per dumpling. (There are 8 tablespoons in 1/2 cup and 3 teaspoons in one tablespoon- 24 teaspoons for 24 dumplings) Perhaps the ratios in the Gourmet recipe I was using are authentic, but they are not adequate for what we are trying to accomplish. Yank Sing had about 2 teaspoons in each dumpling with about 1/2 the amount of pork. What to do now? Unfortunately, we mixed all of the aspic I made into the pork, so we cannot re-apportion the filling. Perhaps we can save it yet. I'll have to do some investigating.
Tuesday, September 26, 2006
Shanghai Soup-less Buns
One of our favorite places for lunch is Yank Sing and our favorite dim sum is their signature dish-Shanghai pork dumplings, also called Shanghai stuffed soup buns. They are sealed dumplings filled with seasoned ground pork and miraculously, soup that pops in your mouth when you bite into it. The key to getting the soup inside is stuffing the dough with a cube of aspic, a jelled, concentrated broth made from simmering pork and chicken bones. The aspic itself takes some time not only to cook, but also to jell, so I took the opportunity of being at home for a few hours over the weekend to make it. After 4 cups of liquid was condensed to 1/2 cup, I strained and chilled the aspic. Today, I had thought the tough part was already done in the preparation for soup buns, but I was thrown for a loop. We mixed the ground pork with the seasonings and using a method from the February, 2005 issue of Gourmet that I kept for this sole purpose, I cut up the aspic and combined it right into the pork mixture. After the tedious job of hand rolling a few of the dumplings and stuffing them with the pork and aspic, we decided to do a trial steaming of 6 of the dumplings to make sure we weren't rolling the dough too thick or putting too much or too little filling in them. A 10 minute steam revealed some beautiful, fragile dumplings that were similar in appearance to Yank Sings. We dipped them in vinegar and placed them on our tongues anticipating the signature pop of the dumpling followed by a flow of rich broth to all corners of our mouths...and there was nothing. No flavorful elixir flowed from these buns. We were both disappointed. It was a failure, but not a complete one. We still have more filling so tomorrow we plan to try using more of the pork mixture in each bun. It's all trial and error, but luckily along the way, we've got plenty to eat.
Friday, September 15, 2006
E. coli Across Eight States
The recent bagged spinach scare reminds us of the potential dangers of a centralized food supply. Tainted food could be devastating to the health of individuals not just across a few counties, but across states. According to the attached article from www.sfgate.com, so far due to this particular E. coli contamination, "Twenty people fell ill in Wisconsin. There were 11 cases in Utah, five in Oregon, four in Indiana, three each in Idaho and Michigan, two in New Mexico and one in Connecticut."
In addition to the superior taste, nutritional content, and quality of local, sustainably grown vegetables is the cleanliness of the product and the safety in knowing where and who your food came from. I think I'll buy some spinach at the farmer's market this weekend.
In addition to the superior taste, nutritional content, and quality of local, sustainably grown vegetables is the cleanliness of the product and the safety in knowing where and who your food came from. I think I'll buy some spinach at the farmer's market this weekend.
Wednesday, September 06, 2006
Breakfast Casserole
This post is for members of the Clem family who recently asked for the recipe for my breakfast casserole.
When you have friends or family in town and need a quick, filling breakfast that can be prepared ahead (in case you need to nurse a hang-over), this is it. In my own experience, I've found it also goes wonderfully well with Bloody Mary's and Mimosa's and perhaps a side of potatoes, which are also great for that "day after" kind of breakfast. It's nothing fancy, but I've found the taste and hominess of the dish makes up for what it lacks in looks. If you're looking for an eye-catcher, finish the meal with my Cinnamon Nut Coffee Cake from the August 7, 2005 posting made in a fancy bundt pan.
Like the Cinnamon Nut Coffee Cake, the breakfast casserole is a dish my mom often made, but I've embellished it with additional veggies and herbs and have adjusted the egg/milk mixture ratio. Most importantly, I use good quality aged cheese. This past weekend, I first made traditional white bread in the breadmaker for the basic casserole and used some store bought sliced wheat bread for the other. On the wheat bread variation, I added fresh spinach and basil, then sprinkled freshly grated parmesan over the vegetables and added grated Swiss cheese instead of cheddar. Here's the basic recipe, feel free to embellish as you like.
Breakfast Casserole
12 to 14 slices white bread, crusts removed
1 stick of butter, melted
6 ounces cooked ham, cubed (more or less)
6 cremini mushrooms, sliced
1/2 green or red bell pepper, diced
1/2 onion, diced
salt
fresh ground black pepper
6 ounces aged cheddar cheese, grated
6 Eggs
2 cups milk
1 teaspoon kosher salt (or 1/2 teaspoon table salt)
1 teaspoon paprika
Using a pastry brush, butter a 13X8" casserole dish with a little of the melted butter. Then, after removing the crusts from the bread, brush one side of 6 to 7 slices with the melted butter. Place the buttered side down in the casserole, in one layer, cutting the seventh piece in half if necessary to fill in on the ends. Layer the ham and then the diced vegetables over the bread. Salt and pepper the vegetables. Then sprinkle with grated cheese. On top of the filling, place the remaining 1/2 of the bread slices on one layer buttered side UP, again cutting one in half to fill in on the end of the pan if needed.
Beat the eggs with the milk, salt and paprika and poor the mixture over the bread slices. Cover the casserole with plastic wrap and place in the refrigerator over night.
The next morning, preheat the oven to 350 degrees and bake for about 40 to 45 minutes until lightly browned on top and the egg has set. Let cool slightly, then slice, serve and sit back and enjoy the company.
When you have friends or family in town and need a quick, filling breakfast that can be prepared ahead (in case you need to nurse a hang-over), this is it. In my own experience, I've found it also goes wonderfully well with Bloody Mary's and Mimosa's and perhaps a side of potatoes, which are also great for that "day after" kind of breakfast. It's nothing fancy, but I've found the taste and hominess of the dish makes up for what it lacks in looks. If you're looking for an eye-catcher, finish the meal with my Cinnamon Nut Coffee Cake from the August 7, 2005 posting made in a fancy bundt pan.
Like the Cinnamon Nut Coffee Cake, the breakfast casserole is a dish my mom often made, but I've embellished it with additional veggies and herbs and have adjusted the egg/milk mixture ratio. Most importantly, I use good quality aged cheese. This past weekend, I first made traditional white bread in the breadmaker for the basic casserole and used some store bought sliced wheat bread for the other. On the wheat bread variation, I added fresh spinach and basil, then sprinkled freshly grated parmesan over the vegetables and added grated Swiss cheese instead of cheddar. Here's the basic recipe, feel free to embellish as you like.
Breakfast Casserole
12 to 14 slices white bread, crusts removed
1 stick of butter, melted
6 ounces cooked ham, cubed (more or less)
6 cremini mushrooms, sliced
1/2 green or red bell pepper, diced
1/2 onion, diced
salt
fresh ground black pepper
6 ounces aged cheddar cheese, grated
6 Eggs
2 cups milk
1 teaspoon kosher salt (or 1/2 teaspoon table salt)
1 teaspoon paprika
Using a pastry brush, butter a 13X8" casserole dish with a little of the melted butter. Then, after removing the crusts from the bread, brush one side of 6 to 7 slices with the melted butter. Place the buttered side down in the casserole, in one layer, cutting the seventh piece in half if necessary to fill in on the ends. Layer the ham and then the diced vegetables over the bread. Salt and pepper the vegetables. Then sprinkle with grated cheese. On top of the filling, place the remaining 1/2 of the bread slices on one layer buttered side UP, again cutting one in half to fill in on the end of the pan if needed.
Beat the eggs with the milk, salt and paprika and poor the mixture over the bread slices. Cover the casserole with plastic wrap and place in the refrigerator over night.
The next morning, preheat the oven to 350 degrees and bake for about 40 to 45 minutes until lightly browned on top and the egg has set. Let cool slightly, then slice, serve and sit back and enjoy the company.
Wednesday, August 23, 2006
All Natural Graham Crackers
I love Graham crackers, especially when they are under a luscious New York style cheese cake or topped with chocolate chips and coconut. I recently wanted to buy a box to have on hand should I get the urge to make one of these treats, when I discovered on the side of a box of Honey Maids, right there in the list of ingredients, the evil, silent killer: partially hydrogenated cottonseed oil. Sure, the Trans Fats content is "0g" under the Nutrition Facts, but that just means it contains less than one half of a gram per serving. That means these graham crackers could contain up to .49 grams of trans fat per serving and still say it contains 0 grams on the nutrition label. What if I decide to have two servings? Honestly, a few crackers in the crust of a cheese cake are probably should not be a health concern considering what's sitting on top of it, but none-the-less, I have principles and I choose not to eat hydrogenated oils partially hydrogenated or not. I left the store Graham-less.
Last night, Lou mentioned he had a craving for Chippy Dippy bars. A simple, quick and easy recipe of chocolate chips and sweetened coconut sprinkled over graham crackers laid out on a backing sheet with sweetened condensed milk drizzled over it, then baked at 350 degrees until slightly browned and gooey. I reminded him I had not purchased the graham crackers as planned. He reminded me I had decided to make the crackers due to my obsession with eating all natural fats. And so I took on the challenge.
The internet is an amazing thing. In the course of an hour, I can research what the heck Graham is, find a recipe for Graham crackers and figure out how to adjust it for the ingredients I have on hand. It turns out these crackers I've refused to buy due to their ingredients were once considered a health food. They also didn't use to contain so much sugar. Back in 1830, Graham, for whom the cracker and the flour was named, was well ahead of his time, preaching (literally-he was Reverand Sylvester Graham) against refined flour.
Interestingly enough, the recipe I found had not a drop of Graham flour in it. It called for a mixture of all-purpose, whole wheat, and rye. Graham flour is a type of whole grain flour containing all of the bran and germ of the wheat. As a nod to Graham's good intentions toward healthy eating (although he sounded pretty nutty) I decided to use all whole wheat flour in place of the three flours called for. More specifically, I used white whole wheat flour, knowing that it could replace the all-purpose flour and easily replace a mixture of all-purpose and whole wheat.
Graham Crackers
2 cups white whole-wheat flour
1/2 cup sugar
1 teaspoon baking powder
1/2 teaspoon baking soda
1 teaspoon kosher salt (or 1/2 teaspoon table salt)
1/4 teaspoon ground cinnamon
1/2 cup cold unsalted butter, cubed
2 tablespoons honey
2 tablespoon molasses (I used black strap)
1/4 cup cold water
1 teaspoon vanilla extract
In the bowl of a food processor or electric stand mixer, stir together the flour, sugar, baking powder, baking soda, salt, and cinnamon. Add the cold butter and process or mix until the mixture resembles coarse meal. Add the honey, molasses, water, and vanilla. Mix until the dough comes together in a ball.
Between 2 sheets of waxed paper or plastic wrap, roll the dough 1/2-inch thick. Chill for 1 hour, until firm. Preheat the oven to 350 degrees. Dust the dough with flour and roll to 1/8-inch thickness. Cut into 2-inch squares. Arrange the crackers on parchment lined cookie sheets. With a toothpick, prick several holes in each cracker. Bake for 15 minutes, or until browned.
Based on "Homemade Graham Crackers Recipe" on About.com
Last night, Lou mentioned he had a craving for Chippy Dippy bars. A simple, quick and easy recipe of chocolate chips and sweetened coconut sprinkled over graham crackers laid out on a backing sheet with sweetened condensed milk drizzled over it, then baked at 350 degrees until slightly browned and gooey. I reminded him I had not purchased the graham crackers as planned. He reminded me I had decided to make the crackers due to my obsession with eating all natural fats. And so I took on the challenge.
The internet is an amazing thing. In the course of an hour, I can research what the heck Graham is, find a recipe for Graham crackers and figure out how to adjust it for the ingredients I have on hand. It turns out these crackers I've refused to buy due to their ingredients were once considered a health food. They also didn't use to contain so much sugar. Back in 1830, Graham, for whom the cracker and the flour was named, was well ahead of his time, preaching (literally-he was Reverand Sylvester Graham) against refined flour.
Interestingly enough, the recipe I found had not a drop of Graham flour in it. It called for a mixture of all-purpose, whole wheat, and rye. Graham flour is a type of whole grain flour containing all of the bran and germ of the wheat. As a nod to Graham's good intentions toward healthy eating (although he sounded pretty nutty) I decided to use all whole wheat flour in place of the three flours called for. More specifically, I used white whole wheat flour, knowing that it could replace the all-purpose flour and easily replace a mixture of all-purpose and whole wheat.
Graham Crackers
2 cups white whole-wheat flour
1/2 cup sugar
1 teaspoon baking powder
1/2 teaspoon baking soda
1 teaspoon kosher salt (or 1/2 teaspoon table salt)
1/4 teaspoon ground cinnamon
1/2 cup cold unsalted butter, cubed
2 tablespoons honey
2 tablespoon molasses (I used black strap)
1/4 cup cold water
1 teaspoon vanilla extract
In the bowl of a food processor or electric stand mixer, stir together the flour, sugar, baking powder, baking soda, salt, and cinnamon. Add the cold butter and process or mix until the mixture resembles coarse meal. Add the honey, molasses, water, and vanilla. Mix until the dough comes together in a ball.
Between 2 sheets of waxed paper or plastic wrap, roll the dough 1/2-inch thick. Chill for 1 hour, until firm. Preheat the oven to 350 degrees. Dust the dough with flour and roll to 1/8-inch thickness. Cut into 2-inch squares. Arrange the crackers on parchment lined cookie sheets. With a toothpick, prick several holes in each cracker. Bake for 15 minutes, or until browned.
Based on "Homemade Graham Crackers Recipe" on About.com
Sunday, August 13, 2006
Mashed Potato Maker?
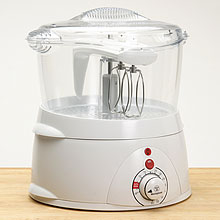
Now I've seen everything. Westinghouse seems to think that there's a need for an appliance whose sole purpose is to steam and then mash vegetables. Or, perhaps they found there really isn't a need because it's being sold for $19.99 on Smart Bargains. No wonder.
If you'd like to make fantastic mashed potatoes, don't bother buying fancy mixers or mashers. Just buy a basic hand masher, like this one at Sur La Table.

Choose good quality potatoes. I like Newman's Own Organic. Both the Russet and the Red potatoes have excellent flavor and texture when mashed. After peeling the potatoes, cut them into equal sized cubes or slices so they cook evenly and at the same rate. Then cover them with cold water in a saucepan. Salt generously with kosher salt. One teapsoon for every two potatoes should be a good ratio. We usually make 4 potatoes and use 2 teaspoons kosher salt. You can add more if needed during the mashing process.
Cover the pot and bring to a boil, then reduce heat and simmer for about 20 minutes or until fork tender. Drain well and return to pot. Place on very low heat with lid off and allow excess moisture to evaporate while mashing by hand. Add as little or as much butter as you like. We use a little extra butter for special occasions, but normally use just a couple of pats on a weeknight. Just make sure you're using REAL butter. After the butter is incorporated, add milk as needed and mix in until the potato mixture is fluffy and lump-free, that is unless you like nurdles, as they are called in our house. Salt to taste and add freshly ground white pepper as desired. Most importantly, and because it seems everyone is particular about how they like their mashers, practice this recipe a few times so you can tweak it and make them just as you like them. You'll find you can easily make your favorite mashed potatoes without any fancy contraptions.
Sunday, August 06, 2006
White Whole Wheat Chocolate Chip Cookies
Much of the whole wheat flour we buy in the store and which is used in making the whole grain breads we buy is made from red wheat. The red refers to the color of their kernel, which is reddish brown, coated with phenolic compounds. In the past year, I have been experimenting with a new find-white whole wheat flour. White is not alluding to a mixture of all-purpose and whole wheat flour, but acutally is referring to the white wheat from which it is ground. White wheat has a lower phenolic content than red wheat resulting in a kernel that is a light tan color and a flour that has a "Lighter Color, Milder Flavor" according to my bag of King Arthur. Bob's Red Mill sells it under the label of "Whole Wheat Pastry Flour".
My first experiment was to replace the half red whole wheat flour, half all-purpose flour mixture I usually used in my banana bread recipe with the white whole wheat flour. When the bread came out moist and with a mild wheat flavor that didn't mask the banana, I decided to try the white whole wheat flour in something sweeter- Chocolate chip cookies. I had attempted making whole wheat chocolate chip cookies before but the whole wheat flour I used always overpowered the vanilla flavored dough I loved and so I always came back to making my mom's recipe with good quality unbleached all-purpose flour.
So why not just use all-purspose flour? Unlike all-purpose flour, whole wheat flour contains the entire or "whole" berry and therefore retains the naturally occurring vitamins and minerals not to mention the fiber of the bran. As a general rule, less processing means greater retention of nutrients.
Mom's recipe had to be tweaked slightly by adding extra vanilla to compensate for the stronger wheat flavor, but other than that, the chewy cookies worked just fine with my change in flour. It has been suggested they are actually more satisfying than the cookies made with all-purpose flour since they are somewhat heartier and seemingly more filling.
However delicious they seemed to us, I wondered if we had developed a taste for them and if the whole wheat version of our chocolate chip cookies would be liked by sweet-toothed kids- the target market for America's favorite cookies. The kid test was passed this past week when I made them for Lou's nephews. The choosey eaters gobbled them down without any thought as to what type of flour might have been used. Here's the recipe, so you can try them for yourself. A stand mixer makes the process much easier.
White Whole Wheat Chocolate Chip Cookies
based on Mom's recipe
3/4 cup unsalted butter softened
1 cup light brown sugar
1/2 cup granulated sugar
2 large eggs
2 teaspoons vanilla
3 cups white whole wheat flour
1 1/2 teaspoons baking soda
1 teaspoon kosher salt (or 1/2 teaspoon table salt)
8 ounces semi-sweet chocolate chips (more or less as desired)
3/4 cup broken walnuts
Preheat oven to 350 degrees. Cream butter and sugars in the bowl of an electric stand mixer using the paddle attachment or in a large mixing bowl using a hand beater. Add eggs and vanilla, mix to combine. While mixer is turned off, add the flour, soda, and salt. Mix or stir to combine thoroughly. (If you're doing this by hand, it will be a great workout-this dough is stiff) Stir in chocolate chips and walnuts by hand. Scoop by tablespoons onto a parchment covered or prepared baking sheet and bake at 350 degrees for about 12 minutes or until cookies no longer feel raw to the touch. Do not brown or overbake. Cool (if you can) and enjoy!
My first experiment was to replace the half red whole wheat flour, half all-purpose flour mixture I usually used in my banana bread recipe with the white whole wheat flour. When the bread came out moist and with a mild wheat flavor that didn't mask the banana, I decided to try the white whole wheat flour in something sweeter- Chocolate chip cookies. I had attempted making whole wheat chocolate chip cookies before but the whole wheat flour I used always overpowered the vanilla flavored dough I loved and so I always came back to making my mom's recipe with good quality unbleached all-purpose flour.
So why not just use all-purspose flour? Unlike all-purpose flour, whole wheat flour contains the entire or "whole" berry and therefore retains the naturally occurring vitamins and minerals not to mention the fiber of the bran. As a general rule, less processing means greater retention of nutrients.
Mom's recipe had to be tweaked slightly by adding extra vanilla to compensate for the stronger wheat flavor, but other than that, the chewy cookies worked just fine with my change in flour. It has been suggested they are actually more satisfying than the cookies made with all-purpose flour since they are somewhat heartier and seemingly more filling.
However delicious they seemed to us, I wondered if we had developed a taste for them and if the whole wheat version of our chocolate chip cookies would be liked by sweet-toothed kids- the target market for America's favorite cookies. The kid test was passed this past week when I made them for Lou's nephews. The choosey eaters gobbled them down without any thought as to what type of flour might have been used. Here's the recipe, so you can try them for yourself. A stand mixer makes the process much easier.
White Whole Wheat Chocolate Chip Cookies
based on Mom's recipe
3/4 cup unsalted butter softened
1 cup light brown sugar
1/2 cup granulated sugar
2 large eggs
2 teaspoons vanilla
3 cups white whole wheat flour
1 1/2 teaspoons baking soda
1 teaspoon kosher salt (or 1/2 teaspoon table salt)
8 ounces semi-sweet chocolate chips (more or less as desired)
3/4 cup broken walnuts
Preheat oven to 350 degrees. Cream butter and sugars in the bowl of an electric stand mixer using the paddle attachment or in a large mixing bowl using a hand beater. Add eggs and vanilla, mix to combine. While mixer is turned off, add the flour, soda, and salt. Mix or stir to combine thoroughly. (If you're doing this by hand, it will be a great workout-this dough is stiff) Stir in chocolate chips and walnuts by hand. Scoop by tablespoons onto a parchment covered or prepared baking sheet and bake at 350 degrees for about 12 minutes or until cookies no longer feel raw to the touch. Do not brown or overbake. Cool (if you can) and enjoy!
Monday, July 24, 2006
Fresh Strawberry Topping
Growing up we often had a slice of angel food or yellow cake drowned in sweetened strawberries for dessert. At least my slices were always drowned because I was allowed to add the berry topping at my own discretion. They almost seemed unlimited as we were fortunate enough to have bushels of fresh berries picked from a patch in our mother's garden. When strawberry season was over, there was frozen berries in the freezer and what seemed like endless jars of jam.
Today I don't have my own berry patch, but I make the most of strawberry season by buying the fruit when available down at the farmer's market. This past Saturday I found some absolute jewels at Dirty Girl Produce at the Ferry Plaza. One great thing about having access to a farmer's market is you're able to buy the old varieties of strawberries that have not been engineered or cross bred to ship long distances. I shutter when I see some of the huge berries in the super market. Dry and flavorless, these often are more white then red. The Dirty Girl berries had not been toyed with. These were the small, sumptuous berries of my childhood and not a smidgeon of white flesh was found as I detopped them. It's getting late in the year, but if you run into some ruby red juicy strawberries that taste like strawberries are supposed to taste, make some cake and top it with this simple concoction.
Buy three pints of small, great tasting strawberries
Clean and detop them reserving 1/3 of them in a separate bowl (I usually reserve the most attractive ones)
Mash the 2/3 with a pastry blender or chopper. Or just pulse a couple of times in a food processor. It should be pretty chunky, just mash until the juices flow. Stir in sugar to taste. Start with 1/4 of a cup. When the sugar is dissolved, add the whole reserved berries and stir them in. Refrigerate until ready to use.
Today I don't have my own berry patch, but I make the most of strawberry season by buying the fruit when available down at the farmer's market. This past Saturday I found some absolute jewels at Dirty Girl Produce at the Ferry Plaza. One great thing about having access to a farmer's market is you're able to buy the old varieties of strawberries that have not been engineered or cross bred to ship long distances. I shutter when I see some of the huge berries in the super market. Dry and flavorless, these often are more white then red. The Dirty Girl berries had not been toyed with. These were the small, sumptuous berries of my childhood and not a smidgeon of white flesh was found as I detopped them. It's getting late in the year, but if you run into some ruby red juicy strawberries that taste like strawberries are supposed to taste, make some cake and top it with this simple concoction.
Buy three pints of small, great tasting strawberries
Clean and detop them reserving 1/3 of them in a separate bowl (I usually reserve the most attractive ones)
Mash the 2/3 with a pastry blender or chopper. Or just pulse a couple of times in a food processor. It should be pretty chunky, just mash until the juices flow. Stir in sugar to taste. Start with 1/4 of a cup. When the sugar is dissolved, add the whole reserved berries and stir them in. Refrigerate until ready to use.
Thursday, July 06, 2006
Sushi at Home
Attempting to make sushi at home can be a daunting undertaking, but once you practice it a few times, it really sticks-literally. Contrary to popular belief, sushi does not mean raw fish, it actually refers to food made with vinegared rice, or sumeshi. Correctly seasoned sumeshi is the key to good flavored sushi. I've found great results by following the guidance of Emi Kazuko in her book, Easy Sushi. I use a rice cooker to cook the short grained Japanese rice and then follow her technique of folding the seasoned rice vinegar into the just-cooked short grain rice as it cools to body temperature. Next thing you know, the rice is sticky but not mushy. The individual grains seem to be coated with glue.
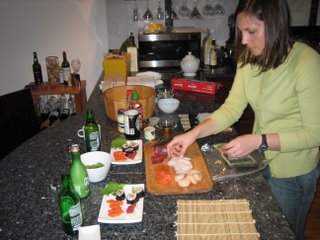
With a foundation of well made sumeshi and a bamboo roller, you can tackle making your favorite sushi rolls. Just julien (cut into matchsticks) a variety of vegetables such as cucumber, avocado, and green onions. Thinly slice fresh herbs such as japanese shiso leaves or thai basil, then cook some shrimp, slice some raw fish, and set it all out for everyone to create their own favorite combinations. This is a great way to get friends and family involved in making dinner. Honestly, this is about the only thing Lou makes besides tuna melts and burritos, so it's worth a little preparation for some quality time in the kitchen.
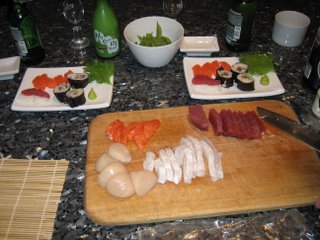
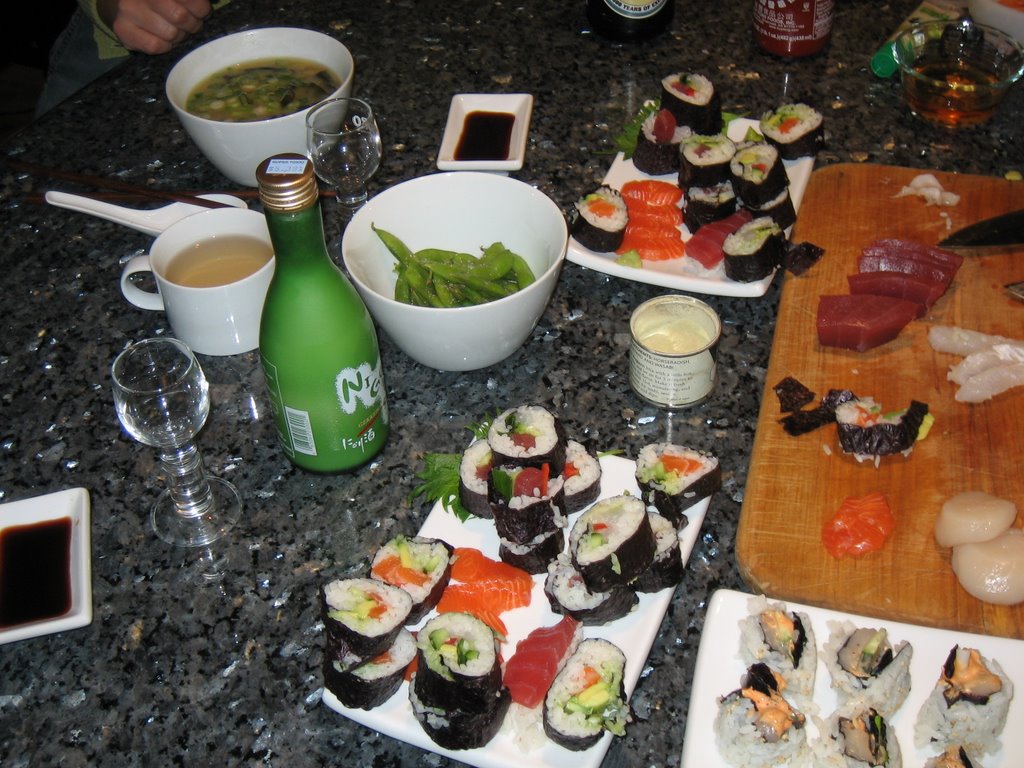
As you can see, a little fish goes a long way. We were stuffed after the miso soup, edamame, sashimi, and all our favorite sushi rolls topped off with some unfiltered sake. Next time, we'll invite some friends.
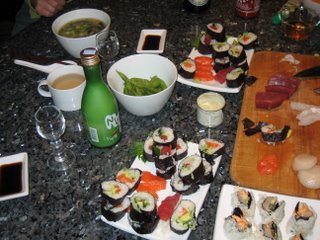
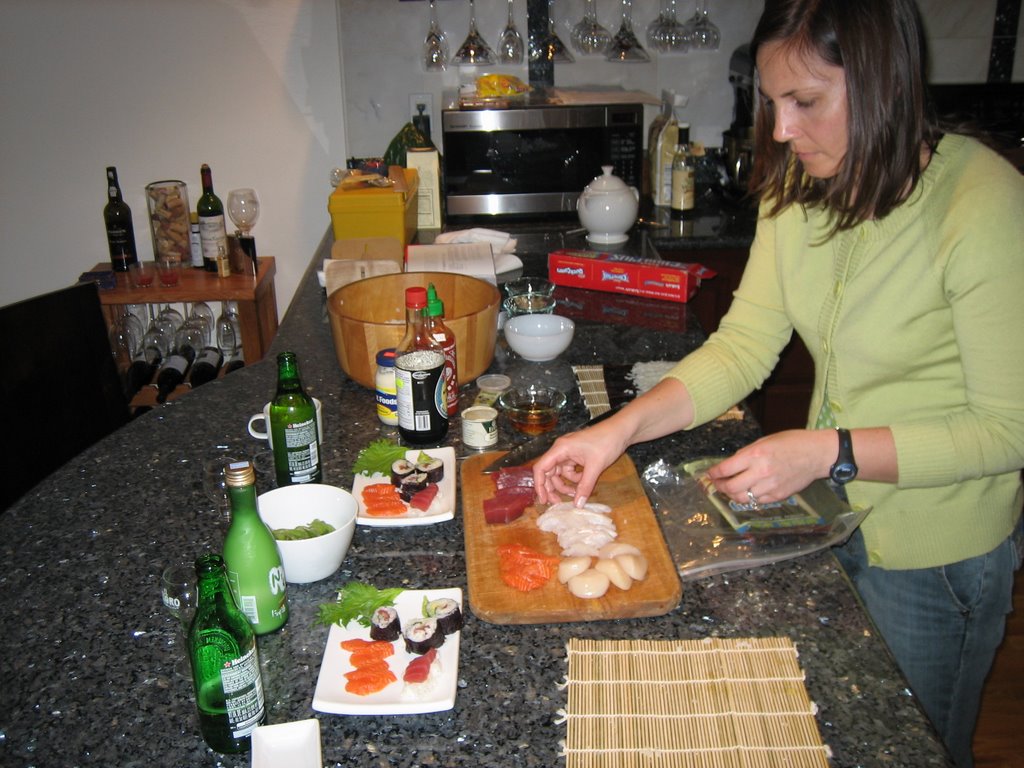
With a foundation of well made sumeshi and a bamboo roller, you can tackle making your favorite sushi rolls. Just julien (cut into matchsticks) a variety of vegetables such as cucumber, avocado, and green onions. Thinly slice fresh herbs such as japanese shiso leaves or thai basil, then cook some shrimp, slice some raw fish, and set it all out for everyone to create their own favorite combinations. This is a great way to get friends and family involved in making dinner. Honestly, this is about the only thing Lou makes besides tuna melts and burritos, so it's worth a little preparation for some quality time in the kitchen.

As you can see, a little fish goes a long way. We were stuffed after the miso soup, edamame, sashimi, and all our favorite sushi rolls topped off with some unfiltered sake. Next time, we'll invite some friends.
Monday, June 26, 2006
When life gives you sour milk… make chocolate cookies
When I was a kid, my mom would make my grandmother’s chocolate cookies when we had milk or cream that had gone sour. The sour cream her recipe calls for is not the thick custard-consistency topping we use on Mexican food. It is actually the chunky, clumpy liquid that results when you leave milk or cream in the refrigerator a week past its due date. Lou thought I was crazy when he was about to dump the old container of cream into the compost bin and I stopped him saying I wanted to use it to make cookies. Sour milk and cream are great for baking because their increased acidity causes them to react with baking soda. Their use in this recipe results in a tender, cake-like cookie. In fact, these are so cake-like, my grandmother used to frost the bottoms, which intrigued us even more than the fact that such delectable treats could come from sour milk.
Grandma Helen’s Chocolate Cookies
1 cup unsalted butter
2 cups light brown sugar
1 cup granulated sugar
¾ cup cocoa
4 large eggs
2 teaspoons vanilla
1 cup sour cream or sour milk
6 cups all purpose flour
2 teaspoons baking soda
2 teaspoons table salt
Preheat oven to 350 degrees. Warm butter to room temperature (can be done by zapping for 30 seconds or so in microwave). In a large bowl, cream the butter with the sugars. Add the cocoa and mix until incorporated. Add the eggs and vanilla. Combine.
In a separate bowl, mix the flour with the baking soda and salt. Then while mixing, alternately add 1/2 of the flour mixture and 1/2 of the sour cream to the dough, then the remaining flour and sour cream and mix until incorporated.
Drop by rounded tablespoons onto prepared baking sheets and bake at 350 degrees for about 12 minutes. Cool and frost the bottoms with your favorite chocolate frosting if desired. As a kid, I loved the frosted bottoms, but these days I prefer the cookie sans frosting.
Grandma Helen’s Chocolate Cookies
1 cup unsalted butter
2 cups light brown sugar
1 cup granulated sugar
¾ cup cocoa
4 large eggs
2 teaspoons vanilla
1 cup sour cream or sour milk
6 cups all purpose flour
2 teaspoons baking soda
2 teaspoons table salt
Preheat oven to 350 degrees. Warm butter to room temperature (can be done by zapping for 30 seconds or so in microwave). In a large bowl, cream the butter with the sugars. Add the cocoa and mix until incorporated. Add the eggs and vanilla. Combine.
In a separate bowl, mix the flour with the baking soda and salt. Then while mixing, alternately add 1/2 of the flour mixture and 1/2 of the sour cream to the dough, then the remaining flour and sour cream and mix until incorporated.
Drop by rounded tablespoons onto prepared baking sheets and bake at 350 degrees for about 12 minutes. Cool and frost the bottoms with your favorite chocolate frosting if desired. As a kid, I loved the frosted bottoms, but these days I prefer the cookie sans frosting.
Tuesday, June 13, 2006
Sous Vide
I helped out with the cooking demonstration down at the farmer's market at the Ferry Building this past Saturday. It's called "Market to Table" and it is every Saturday at 10:30 after "Meet the Farmer" at 10:00. I enjoy meeting the professional chefs and authors that demonstrate their recipes and it is fun to see what goes on behind the scenes to put these events together.
Saturday's Market to Table featured Bruce Hill of Picco and Bix. He brought a really interesting technique to the spot light: Sous Vide. It means "under vacuum". The technique involves cooking meat (in his case, duck breast) in a vacuum sealed bag that is placed in a water bath that measures 130 degrees for one hour. (He used a crock pot to facilitate this) The idea is that you bring the meat or fish to a desired end temperature by placing it in water of that exact temperature, allowing the protein to gently cook as it comes up to that temperature. The product that results from this extremely even cooking method does not have a gradient of done-ness from the outside to the inside. It was the same color throughout. It does not lose any moisture and is therefore also very tender.
As you can imagine, this new trend in cooking at a low temperature has sparked some concern among health officials. New York City recently banned it in restaurants there until safety guidelines are drafted. I don't plan on buying a crockpot and trying this at home anytime soon, but while it's still legal in San Francisco, I plan to go to Bix and check it out.
Saturday's Market to Table featured Bruce Hill of Picco and Bix. He brought a really interesting technique to the spot light: Sous Vide. It means "under vacuum". The technique involves cooking meat (in his case, duck breast) in a vacuum sealed bag that is placed in a water bath that measures 130 degrees for one hour. (He used a crock pot to facilitate this) The idea is that you bring the meat or fish to a desired end temperature by placing it in water of that exact temperature, allowing the protein to gently cook as it comes up to that temperature. The product that results from this extremely even cooking method does not have a gradient of done-ness from the outside to the inside. It was the same color throughout. It does not lose any moisture and is therefore also very tender.
As you can imagine, this new trend in cooking at a low temperature has sparked some concern among health officials. New York City recently banned it in restaurants there until safety guidelines are drafted. I don't plan on buying a crockpot and trying this at home anytime soon, but while it's still legal in San Francisco, I plan to go to Bix and check it out.
Wednesday, May 31, 2006
Chinese for Lunch, Italian for Dessert
I was in Chinatown at Lichee Garden for a Dim Sum lunch today. They have amazing pork Siu Mai and a meal there is ridiculously inexpensive. The same Dim Sum lunch that costs $60 at Yank Sing is only $20 at Lichee Garden...for two. We still go to Yank Sing from time to time to get their signature Shanghai pork dumplings, however. They are that good.
Here in San Francisco, the Chinatown and Italian neighborhood of North Beach have been encroaching on each other for years, resulting in Chinese markets residing next to Italian bakeries. And so after my lunch at Lichee garden, I paid a visit to Victoria Pastry in a quest for my favorite Coconut Macaroons. Unfortunately, today they had none, but I did walk away with some tasty information. As I was deciding what to purchase in lieu of the planned coconut macaroons, settling on some almond cookies, an older Italian gentleman walked in and declared what the almond cookies I was buying were called (I could not repeat what the heck he said, but it was very Italian sounding). He proceeded to tell me how they were made remembering his mother's recipe from his childhood days in Miami, Florida. I quickly asked him if he knew how to make the coconut macaroons. His mother's were an egg-white only recipe and I questioned to clarify that they were in fact made with only egg whites and no yolks. He thought they were. I asked if he ever had Victoria Pastry's macaroons and he didn't think he had. I told him they were amazing and a bit richer than the usual macaroon and that I thought they had some egg yolk in them. The woman behind the counter confirmed that indeed they were made with the whole egg. Finally a breakthrough. It only confirmed what I already suspected, but at least I know I'm barking up the right tree. Now I need to figure out how they get their cookies so chewy. I asked her for more information on the recipe, but she only smiled at me. I'm not sure if it was a "you can't have the recipe" smile or a "I don't speak that much English" smile. So I paid for my cookies and left with the little bit of information she afforded me. So far, I've done two trials using whole eggs which have tasted good in their own right, but have not yet come close to the delectable coconut macaroons at Victoria Pastry. One day I shall prevail.
Here in San Francisco, the Chinatown and Italian neighborhood of North Beach have been encroaching on each other for years, resulting in Chinese markets residing next to Italian bakeries. And so after my lunch at Lichee garden, I paid a visit to Victoria Pastry in a quest for my favorite Coconut Macaroons. Unfortunately, today they had none, but I did walk away with some tasty information. As I was deciding what to purchase in lieu of the planned coconut macaroons, settling on some almond cookies, an older Italian gentleman walked in and declared what the almond cookies I was buying were called (I could not repeat what the heck he said, but it was very Italian sounding). He proceeded to tell me how they were made remembering his mother's recipe from his childhood days in Miami, Florida. I quickly asked him if he knew how to make the coconut macaroons. His mother's were an egg-white only recipe and I questioned to clarify that they were in fact made with only egg whites and no yolks. He thought they were. I asked if he ever had Victoria Pastry's macaroons and he didn't think he had. I told him they were amazing and a bit richer than the usual macaroon and that I thought they had some egg yolk in them. The woman behind the counter confirmed that indeed they were made with the whole egg. Finally a breakthrough. It only confirmed what I already suspected, but at least I know I'm barking up the right tree. Now I need to figure out how they get their cookies so chewy. I asked her for more information on the recipe, but she only smiled at me. I'm not sure if it was a "you can't have the recipe" smile or a "I don't speak that much English" smile. So I paid for my cookies and left with the little bit of information she afforded me. So far, I've done two trials using whole eggs which have tasted good in their own right, but have not yet come close to the delectable coconut macaroons at Victoria Pastry. One day I shall prevail.
Wednesday, May 24, 2006
Avocados and a Breakfast Burrito
Avocados are in season and we have been eating our share. Lou is especially partial to these green gems-he particularly likes them on his breakfast burritos. The problem with avocados is you rarely buy them already ripe, in fact, they unlike other fruits, can not ripen on the tree. The avocado tree gives off a chemical that keeps them from ripening. They are often picked and shipped and in your market well before they are ready to eat and so you have to plan ahead and ripen them yourself. This in the past has not been a simple task in our household. You see, Lou can be slightly impatient and there were a few mishaps of trying to pry the pit out of the hard, dry flesh of an unripened avocado. I was letting him man the management of the avocados since he was the primary eater, but I soon realized I needed to intervene. He'd leave them all in the refrigerator and wonder why none were getting soft. Then set them all out of the refrigerator and lose track of them after a week of waiting when suddenly they were all too ripe. I suggested putting one or two avocados in the fruit bowl, where the other fruit live together in harmony giving off ethylene, an important chemical to the ripening process. The fruit worked its magic and Lou is still enamored by how fast an avocado can ripen. While those are being primed for eating, we leave the remaining avocados in the refrigerator and pull them out with adequate time to ripen before we (or he) plan(s) on eating them. And so our system has worked and Lou is maintaining a steady supply of fresh, ripe avocados.
So, how do you keep the unused portion of an avocado from turning black? For thos few times that I don't use a whole avocado, I leave the pit in the unused half. Then, place the skin of the used half (flesh removed) over the pit, covering the exposed flesh of the unused half and put the avocado in a small storage bag tied with a twist tie or wrap the avocado half tight in plastic wrap and store it in the refrigerator.
Lou's Fast and Simple Breakfast Burrito
One large burrito sized flour tortilla
Queso Oaxaca (Mexican string cheese), shredded
(use Mozzarella if you don't have the Mexican variety)
2 eggs scrambled, seasoned with salt and pepper (leftover herbs don't hurt)
1/2 Avocado, salted
a handful of fresh spinach leaves
Salsa
You can probably figure out how he puts this together, but I'll tell you anyway. Place some of the shredded cheese on the cold tortilla on a plate and microwave for a few seconds until the cheese is melted and the tortilla is warm and steamy. Top with eggs, avocado, spinach, and salsa. Roll it up and you're done. The important step here is salting the avocado. Salt brings out so much more of the fruit's flavor.
So, how do you keep the unused portion of an avocado from turning black? For thos few times that I don't use a whole avocado, I leave the pit in the unused half. Then, place the skin of the used half (flesh removed) over the pit, covering the exposed flesh of the unused half and put the avocado in a small storage bag tied with a twist tie or wrap the avocado half tight in plastic wrap and store it in the refrigerator.
Lou's Fast and Simple Breakfast Burrito
One large burrito sized flour tortilla
Queso Oaxaca (Mexican string cheese), shredded
(use Mozzarella if you don't have the Mexican variety)
2 eggs scrambled, seasoned with salt and pepper (leftover herbs don't hurt)
1/2 Avocado, salted
a handful of fresh spinach leaves
Salsa
You can probably figure out how he puts this together, but I'll tell you anyway. Place some of the shredded cheese on the cold tortilla on a plate and microwave for a few seconds until the cheese is melted and the tortilla is warm and steamy. Top with eggs, avocado, spinach, and salsa. Roll it up and you're done. The important step here is salting the avocado. Salt brings out so much more of the fruit's flavor.
Thursday, May 11, 2006
Green Tea
I love green tea. It's a stimulating, yet soothing drink for an afternoon pick-me-up or to wash down an asian-inspired fusion meal prepared by yours truly. Lou and I drink it often and believe in the claims that green tea has antioxidants that are good for you. As Lou puts it, it's a lot better for you than soda. So, when I heard the news that the FDA announced that green tea consumption does not reduce the risk of cardiovascular desease, I was somewhat perplexed. Why in the world would they be picking on green tea while Americans continue to consume fast foods and transfats-things that are known to PROMOTE heart failure? Shouldn't they be re-focusing their efforts? Then I looked into the claim and understood that it was in response to a request from a green tea conglomerate who wanted the FDA to announce "that drinking at least five ounces of green tea a day may reduce the risk of heart disease", obviously in hopes of boosting sales. In light of these circumstances, I'm pleasantly satisfied that the FDA did not make that claim. Imagine if they had. American companies would start to market green tea drinks with added sugar and artificial flavorings and, of course, a miniscule amount of actual green tea. They'd likely charge upwards of $1 for a bottle of a green tea-based concoction that may taste good to the main stream American palate but bear little resemblance to it's antecedent. A bottled beverage with so few remaining antioxidants, who in their sea of additives, would be of no value to the reduction in the risk of heart desease . Not to mention all those bottles that would just add to our land fills. Did you know tea bags are compostable? And cost about 10 cents.
Saturday, May 06, 2006
Cinco de Mayo
Last night we had an impromptu get together for Cinco de Mayo. A friend of ours offered to fish for some fresh bass for fish tacos and for those non-fish eaters, I opted to also make Carne Asada. Lou of course nominated himself bartender and received rave reviews from our guests on his Margaritas. It was not a recipe he developed over time -he asked me at 7:00pm last night how to make a margarita. I told him the classic recipe and he ran with it-measuring the ingredients, shaking the concoction with ice and straining it into cocktail glasses. He couldn't keep up with the demand. We went through 25 limes 2 bottles of tequila, and a bottle of Triple Sec. It's amazing how good a drink can be when you just go back to basics.
Drink Recipe-Margarita
1 part freshly squeezed lime juice
1 part Triple Sec
2 parts Tequila
If desired, rub a slice of lime around the rim of a cocktail glass and dip into a dish of salt. Measure the lime juice, Triple Sec, and Tequila into an ice-filled cocktail shaker, shake, then pour into the prepared cocktail glass. Garnish with a slice of lime. Measuring the ingredients ensures a drink that is not too sour or strong. I think that was the key to Lou's success.
Carne Asada
2 -2 pound flank steaks
1/2 cup orange juice
Juice of 1 lime
4 teaspoons cayenne pepper
2 teaspoons fresh ground black pepper
2 teaspoons kosher salt
4 cloves of garlic
Trim excess fat from the flank steak and slice each of them through the center into 2 thin steaks. Mix the remaining ingredients and marinate the meat for 30 minutes. Drizzle olive oil over the steaks, then grill them on a hot stove-top grill pan or outdoor grill. Serve sliced steaks in a warmed corn tortilla with Guacamole, Salsa Fresca, and Salsa Roja or bottled hot pepper sauce.
Guacamole
4 avocados
1 to 2 limes
2 teaspoons kosher salt, to taste
4 green onions
1/2 teaspoon cumin
Mash the avocados, then stir in lime juice from 1 or 2 limes. I like a strong lime flavor, but some people prefer less. Mix in the salt and then add more lime juice if desired and salt to taste. The salt will counteract the acidity of the lime. Add the green onions and cumin and mix to combine.
Salsa Roja
I love this stuff. the pan roasting creates a smokey flavor that makes the meat taste like it was barbecued even when grilled indoors on the stove-top. It's nice and spicey too!
1/2 cup dried chiles de arbol
2 tomatoes, halved
1/2 teaspoon kosher salt
Remove the stems of the chiles and toast them in a skillet over medium heat, allowing them to blacken. In a small saucepan, just cover the tomatoes with water and boil just until softened. Place the toasted chiles in a blender or small food processor (leaving out any seeds that fell out of the pods and blackened) and cover with tomato water-you won't use all the water. Add the tomatoes and salt and blend until smooth.
Fish Tacos
Marinade:
2 cups buttermilk
1/2 cup chopped cilantro
3 Tablespoons hot pepper sauce such at Tapatillo
1 Tablespoon fresh lime juice
1 teaspoon kosher salt
2 pounds white fish (We used bass and tilapia) cut into 1 inch pieces
2 cups flour
1/2 teaspoon baking powder
2 teaspoons kosher salt
Mix marinade ingredients and pour over fish. Marinate for 30 minutes or up to 3 hours.
Mix together flour, baking powder and 2 teaspoons kosher salt in a shallow bowl. Heat a frying pan over medium heat. Add olive oil to cover the bottom of the hot pan. Dredge the pieces of fish through the flour mixture and pan fry, turning after the under side is crisp. Serve in a corn tortilla with Baja cream sauce and shredded cabbage.
Baja Cream Sauce
1/3 cup crema mexicana or creme fresh
1/3 cup mayonnaise
1/3 cup ketchup
Drink Recipe-Margarita
1 part freshly squeezed lime juice
1 part Triple Sec
2 parts Tequila
If desired, rub a slice of lime around the rim of a cocktail glass and dip into a dish of salt. Measure the lime juice, Triple Sec, and Tequila into an ice-filled cocktail shaker, shake, then pour into the prepared cocktail glass. Garnish with a slice of lime. Measuring the ingredients ensures a drink that is not too sour or strong. I think that was the key to Lou's success.
Carne Asada
2 -2 pound flank steaks
1/2 cup orange juice
Juice of 1 lime
4 teaspoons cayenne pepper
2 teaspoons fresh ground black pepper
2 teaspoons kosher salt
4 cloves of garlic
Trim excess fat from the flank steak and slice each of them through the center into 2 thin steaks. Mix the remaining ingredients and marinate the meat for 30 minutes. Drizzle olive oil over the steaks, then grill them on a hot stove-top grill pan or outdoor grill. Serve sliced steaks in a warmed corn tortilla with Guacamole, Salsa Fresca, and Salsa Roja or bottled hot pepper sauce.
Guacamole
4 avocados
1 to 2 limes
2 teaspoons kosher salt, to taste
4 green onions
1/2 teaspoon cumin
Mash the avocados, then stir in lime juice from 1 or 2 limes. I like a strong lime flavor, but some people prefer less. Mix in the salt and then add more lime juice if desired and salt to taste. The salt will counteract the acidity of the lime. Add the green onions and cumin and mix to combine.
Salsa Roja
I love this stuff. the pan roasting creates a smokey flavor that makes the meat taste like it was barbecued even when grilled indoors on the stove-top. It's nice and spicey too!
1/2 cup dried chiles de arbol
2 tomatoes, halved
1/2 teaspoon kosher salt
Remove the stems of the chiles and toast them in a skillet over medium heat, allowing them to blacken. In a small saucepan, just cover the tomatoes with water and boil just until softened. Place the toasted chiles in a blender or small food processor (leaving out any seeds that fell out of the pods and blackened) and cover with tomato water-you won't use all the water. Add the tomatoes and salt and blend until smooth.
Fish Tacos
Marinade:
2 cups buttermilk
1/2 cup chopped cilantro
3 Tablespoons hot pepper sauce such at Tapatillo
1 Tablespoon fresh lime juice
1 teaspoon kosher salt
2 pounds white fish (We used bass and tilapia) cut into 1 inch pieces
2 cups flour
1/2 teaspoon baking powder
2 teaspoons kosher salt
Mix marinade ingredients and pour over fish. Marinate for 30 minutes or up to 3 hours.
Mix together flour, baking powder and 2 teaspoons kosher salt in a shallow bowl. Heat a frying pan over medium heat. Add olive oil to cover the bottom of the hot pan. Dredge the pieces of fish through the flour mixture and pan fry, turning after the under side is crisp. Serve in a corn tortilla with Baja cream sauce and shredded cabbage.
Baja Cream Sauce
1/3 cup crema mexicana or creme fresh
1/3 cup mayonnaise
1/3 cup ketchup
Wednesday, May 03, 2006
The Fancy Food Show at Copia
This past Sunday, we visited Copia in Napa. It is a food museum that I had heard much about and I was anxious to see what it was all about. We went especially for the Fancy Food Show. It is essentially a convention for the food business. Copia brought some of their favorites from the show back to the museum and in turn showed us what new products they liked best. Unfortunately, the food is not always all that fancy. This year, the chefs at Copia seemed to like seasoned skewers an awfully lot. They gave some away for correctly answered questions and raved about how shipments are backordered due to high demand. I'm not sure how a flavored stick in the middle of a piece of protein can season it throughout (I imagine you'd want to at least salt and pepper the outside surface), but they seemed to think it worked. Personally, I'm going to stick with a marinade or a spice rub the few times I use skewers, but if you want to check it out, you can buy them at Seasoned Skewers.
Lou won a bottle of Soy Vay's Wasabiyaki. He tried a little on our chicken with green beans that we stirred up yesterday in the wok. It was a little sweet for my taste, but Lou seemed to like it. I would just as soon use the individual Asian sauces and ingredients to come up with my own flavors, but for a busy family, which is who their target market is, Wasabiyaki might spice up some weekday meals.
Lou won a bottle of Soy Vay's Wasabiyaki. He tried a little on our chicken with green beans that we stirred up yesterday in the wok. It was a little sweet for my taste, but Lou seemed to like it. I would just as soon use the individual Asian sauces and ingredients to come up with my own flavors, but for a busy family, which is who their target market is, Wasabiyaki might spice up some weekday meals.
Subscribe to:
Posts (Atom)