Sunday, February 11, 2007
Beringer's Wine and Cheese Pairing
This weekend, Lou and I were in Napa for a pre-Valentines wine tasting getaway with some friends. One of the high-lights was a break from the ordinary wine tasting: a wine and cheese pairing at Beringer Vineyards. In fact, the pairings went beyond what wine to drink with which cheese and dug to the roots of why the pairings work. We started with the basic flavor components of sweet, sour, salt, and savory. Apple represented sweet, lemon sour, salt for salt, and accent dissolved in water for the savory, or Umami, component. On the first round, we took a sip of Sauvignon Blanc, then a bite of the apple, and another sip. The Sauvignon Blanc was comparably sour. Doing the same with the Cabernet Sauvignon, we found it to be more tannic. This exercise was repeated with the other flavor components as we observed how our perception of the flavor of the wine changed with each. Finally, we squeezed the lemon slice over the remaining apple, then salted it. The balanced bite brought the wine back to the way it originally tasted before we allowed food to alter it's flavor. Then, we experimented with cheeses- Brie, fresh Chevre, Havarti and Blue were our specimens and for each we found a match. My favorite being Blue with Port. Yum... I recommend you DO try this at home and I've attached a link to learn more from Beringer's website. Of course, you'll be taking quite a few sips, so don't do this before driving or operating heavy equipment. Or, you could do as many wine aficianados do and spit. Of course you still get to eat the cheese!


Monday, January 15, 2007
Sydney's Fast Food
On our recent trip to Australia, we were surprised to see so much fast food, particularly in Sydney. McDonald's and Hungry Jack's, a franchise of Burger King, were everywhere. As you can imagine, when you're traveling out of the country, you'd like to eat something local, something healthy, and most importantly, something you cannot get at home. As you probably well know, I don't even eat fast food when I'm in America, let alone Australia and so I was a bit disappointed to see how prevalent it was. It was also apparent the affect the fast food was having on the health of the population- Sydney was full of overweight Australians. I looked up the data on the World Health Organization's website and found that Australia has overweight and obesity rates comparable to Canada and the UK, none quite as high as the US.
We couldn't take a walk without seeing another corporate giant, Starbucks, and a new competitor, McCafe, taking its share of the coffee market. I had never seen a McCafe before, so when I saw the glass case from the sidewalk filled with sweet treats, I almost walked in to see what they had to offer, then I saw them...the little Ms, all in a row, arch after golden arch signifying this little cafe was no small pastry shop, it was in fact a franchise of the McDonald's corporation. I turned around, declared it was McCafe! and Lou laughed at me for almost being fooled into patronizing my "arch" rival.
Thankfully, we still found a few small, local cafes to have lunches of meat pies and other old fashioned Australian goodies you can’t get in the US. Unfortunately, these small cafes weren’t nearly as busy as those fast food joints.
We couldn't take a walk without seeing another corporate giant, Starbucks, and a new competitor, McCafe, taking its share of the coffee market. I had never seen a McCafe before, so when I saw the glass case from the sidewalk filled with sweet treats, I almost walked in to see what they had to offer, then I saw them...the little Ms, all in a row, arch after golden arch signifying this little cafe was no small pastry shop, it was in fact a franchise of the McDonald's corporation. I turned around, declared it was McCafe! and Lou laughed at me for almost being fooled into patronizing my "arch" rival.
Thankfully, we still found a few small, local cafes to have lunches of meat pies and other old fashioned Australian goodies you can’t get in the US. Unfortunately, these small cafes weren’t nearly as busy as those fast food joints.
Monday, January 01, 2007
Port O'Call, Port Douglas
Two days in Cairns was enough for us. The Great Barrier Reef was amazing off this part of the coast, but we weren’t thrilled with the accommodations we had in Cairns, so we thought why not consider checking out another part of Queensland. We had heard much about Port Douglas- a sleepy town with not much night life, but then we had also heard about its quaint, little town feel. When we found out that the reef tour boats went to different parts of the reef in Port Douglas than they did in Cairns, and since the Great Barrier Reef was the whole reason we were in this neck of the woods, off to Port Douglas we went.
Our ride into Port Douglas was with the hotel courtesy shuttle with the Port O’Call. Our driver was extremely hospitable, telling us everything there is to know about the route between Cairns and Port Douglas. He slowed down by the creek where you could see Crocodiles swimming around and tried to point out a kangaroo eating by a tree near a road side field, but unfortunately, we could not spot him. Our accommodation was, as Lou put it, “a luxurious, full-service budget hotel”. The Port O’Call gave us 30% off any food on the first day of our stay, so after an extremely hot day in the tropics checking out the local beach and having lunch at the main street restaurants, we decided to take a dip in the pool, have a rest, and try the hotel’s outdoor restaurant.
What luck. This self service restaurant where you order at the bar and pick up the plate to take back to your patio table when they call your number was an absolute gem. I ordered the Seafood Platter which consisted of the freshest sea scallops, succulent shrimp, and crisp calamari all sautéed and served alongside a fresh green salad topped by a huge filet of seared barrundi, a white fleshed fish. The seafood was as fresh as I’ve ever tasted and was cooked to perfection. Lou had the pan fried barrundi served with mashed potatoes and blanched broccoli. There was not a single morsel left on his plate. Had they been open on New Years Eve, we may have done what we would normally never do and actually eat at the same place twice.
Our ride into Port Douglas was with the hotel courtesy shuttle with the Port O’Call. Our driver was extremely hospitable, telling us everything there is to know about the route between Cairns and Port Douglas. He slowed down by the creek where you could see Crocodiles swimming around and tried to point out a kangaroo eating by a tree near a road side field, but unfortunately, we could not spot him. Our accommodation was, as Lou put it, “a luxurious, full-service budget hotel”. The Port O’Call gave us 30% off any food on the first day of our stay, so after an extremely hot day in the tropics checking out the local beach and having lunch at the main street restaurants, we decided to take a dip in the pool, have a rest, and try the hotel’s outdoor restaurant.
What luck. This self service restaurant where you order at the bar and pick up the plate to take back to your patio table when they call your number was an absolute gem. I ordered the Seafood Platter which consisted of the freshest sea scallops, succulent shrimp, and crisp calamari all sautéed and served alongside a fresh green salad topped by a huge filet of seared barrundi, a white fleshed fish. The seafood was as fresh as I’ve ever tasted and was cooked to perfection. Lou had the pan fried barrundi served with mashed potatoes and blanched broccoli. There was not a single morsel left on his plate. Had they been open on New Years Eve, we may have done what we would normally never do and actually eat at the same place twice.
Friday, December 29, 2006
The Red Ochre Grill in Cairns, Australia
Kangaroo, crocodile, emu, fresh yellow-fin tuna, wild boar- these are the ingredients of modern Australian cuisine. Like many of the inventive restaurants in the US, Asian influences abound in Australia. Last night at the Red Ochre, instead of barbecued croc on a stick as you might imagine you’d find in the Australian outback, we ate crocodile filled wontons. The Kangaroo was sesame crusted with a horseradish sauce, the emu in the form of a pate. Chef Craig Squire seems well versed in traditional French techniques, splashing his dishes with Asian flavors. My main course was kangaroo, or “roo” as the server referred to it when she asked how my dinner was. I’d had heard it tasted gamey before, and I think that is an accurate representation. The flesh was extremely lean, I found not a bit of grissle or fat in the cut, and it tasted very similar to venison. The roo was served with a quandong chili glaze and Chinese bok choy. The side starch was an inventive and highly caloric sweet potato fritter. It was like eating a donut filled with shreds of sweet potato. Very tasty, and thankfully, Lou helped me with much of it.
Lou ordered the special yellow-fin tuna. It was served with lentils and greens. The fish was a large cut (everything here is served in HUGE portions) and was prepared correctly, but the lentils were a bit bland. Lou liked it, but it was nothing memorable. I will, however, never forget the Aussie Asian-fused Roo at the Red Ochre Grill.
Lou ordered the special yellow-fin tuna. It was served with lentils and greens. The fish was a large cut (everything here is served in HUGE portions) and was prepared correctly, but the lentils were a bit bland. Lou liked it, but it was nothing memorable. I will, however, never forget the Aussie Asian-fused Roo at the Red Ochre Grill.
Tuesday, December 26, 2006
Christmas on Bondi Beach
Lou and I arrived in Australia on New Year's Eve. It was a rainy day so we toured the famous Opera House and walked around the city to get acquainted.
Bondi beach is a quick train and bus ride from downtown Sydney and reportedly the place to be on Christmas day, and so we went. A large mass of hot, silky sand was welcoming after a few cold, rainy days back in San Francisco. I had expected the beach to be filled with Australian families spending quality holiday time together while throwing some “shrimp on the barbie” but in reality it was full of young Aussies hanging out with their friends. It could have been mistaken for an American 4th of July had it not been for the Santa hats everyone was wearing, and some of the red Santa bikinis trimmed with white fur.
The beach goers brought pre-prepared picnic fare instead of the imagined barbecues. The natives were eating buckets of shrimp cocktail while a group of Asian immigrants who sat close to us put soy sauce on their sandwich rolls. Much of the food was not only pre-prepared, but pre-packaged. Chips that taste like chicken seem to be all the rage. The few ocean-side barbecues we saw in action were not emitting the sweet, succulent smells you’d imagine from shrimp and crab, but of over-charred red meat which lay across their grills. Needless to say, it was not a “foodie’s” event.
We ate a late lunch at a sidewalk café where we had originally just stopped for a drink, but since Lou was ordering a beer, we had to also order food due to the Christmas day licenses issued for sidewalk seating. (Apparently, Bondi beach is trying to tone down the Christmas festivities.) I ordered a mixed chicken and steak fajita that turned out to be more Cajun than Mexican and Lou ordered some garlic and butter prawns-you can’t go wrong with shrimp in Australia.
Bondi beach is a quick train and bus ride from downtown Sydney and reportedly the place to be on Christmas day, and so we went. A large mass of hot, silky sand was welcoming after a few cold, rainy days back in San Francisco. I had expected the beach to be filled with Australian families spending quality holiday time together while throwing some “shrimp on the barbie” but in reality it was full of young Aussies hanging out with their friends. It could have been mistaken for an American 4th of July had it not been for the Santa hats everyone was wearing, and some of the red Santa bikinis trimmed with white fur.
The beach goers brought pre-prepared picnic fare instead of the imagined barbecues. The natives were eating buckets of shrimp cocktail while a group of Asian immigrants who sat close to us put soy sauce on their sandwich rolls. Much of the food was not only pre-prepared, but pre-packaged. Chips that taste like chicken seem to be all the rage. The few ocean-side barbecues we saw in action were not emitting the sweet, succulent smells you’d imagine from shrimp and crab, but of over-charred red meat which lay across their grills. Needless to say, it was not a “foodie’s” event.
We ate a late lunch at a sidewalk café where we had originally just stopped for a drink, but since Lou was ordering a beer, we had to also order food due to the Christmas day licenses issued for sidewalk seating. (Apparently, Bondi beach is trying to tone down the Christmas festivities.) I ordered a mixed chicken and steak fajita that turned out to be more Cajun than Mexican and Lou ordered some garlic and butter prawns-you can’t go wrong with shrimp in Australia.
Tuesday, December 19, 2006
Hot Crab and Artichoke Dip
It is not often that I try a new recipe in which I am completely disappointed, but this was certainly one of them. I made this "Hot Crab and Artichoke Dip" for a casual Sunday night gathering with a few friends and it did not turn out as I expected. It was quite bland and even a dash of tabasco on each serving did little to bring it to life. I was left with a mostly untouched casserole dish full of dip that I had no idea what to do with. After wondering what to make for dinner the next night, it dawned on me that we might be able to reinvent it as crab cakes. I added a little mayo, lots of tabasco, some garlic, shallot, and pepper. Then rolled them in Japanese bread crumbs, fried them in olive oil, and voila...they weren't half bad. Much better than the dip we started with. I served it with some fresh baby romaine and a herb/mayo/white wine vinegar dressing and the total package was worth much more than the sum of it's parts. So you might ask, what's the moral of this story? 1) don't bother making this crab and artichoke dip, there are much better alternatives out there, and 2) you can usually salvage anything if you put a little creative effort towards it.
Sunday, December 10, 2006
Perfect Peanut Brittle
I've experimented with Peanut Brittle since I was a kid. Confectionary cooking was my entry into the food world. Not only did I enjoy eating the fruits of my labor, but I've always been entrigued by the chemistry of cooking- the way temperature affects sugar particularly interests me. If you cook the sugars to too high of a temperature, your peanut brittle will not be brittle, but rock hard. If you don't bring it to a high enough temperature, it'll be peanut chew. Then, when the brittle's off the heat, you can add some baking soda and it becomes foamy instead of glossy and dense.
The keys to great peanut brittle in my opinion are: make it foamy, cook it to exact temperatures (use a good candy thermometer), and use lots of peanuts chopped up to just the right sizes -some chopped fine, some left in halves. I find an easy way to do this is pulse them in a food processor. The resulting inconsistent chop is just right. The smaller pieces blend into the sugars and flavor the candy with rich peanut taste, while the large pieces make for a nice chunky brittle.
I think the absolute best recipe is the one for "Old Fashioned Peanut Brittle" on Epicurios.com. It can be made weeks ahead of time, then stored in an airtight container so it was the first sweet I made for the holiday season. Although, I mixed up a batch a week ago and I'm almost out-with two weeks to go until Christmas. I plan on making another this week to make sure everyone gets a taste and to try to stretch it until the 25th.
The keys to great peanut brittle in my opinion are: make it foamy, cook it to exact temperatures (use a good candy thermometer), and use lots of peanuts chopped up to just the right sizes -some chopped fine, some left in halves. I find an easy way to do this is pulse them in a food processor. The resulting inconsistent chop is just right. The smaller pieces blend into the sugars and flavor the candy with rich peanut taste, while the large pieces make for a nice chunky brittle.
I think the absolute best recipe is the one for "Old Fashioned Peanut Brittle" on Epicurios.com. It can be made weeks ahead of time, then stored in an airtight container so it was the first sweet I made for the holiday season. Although, I mixed up a batch a week ago and I'm almost out-with two weeks to go until Christmas. I plan on making another this week to make sure everyone gets a taste and to try to stretch it until the 25th.
Tuesday, November 28, 2006
Thanksgiving Recovery
I'm still stuffed. Turkey and some of the fixings still remain in my fridge. With the mashed potatoes dusted and the stuffing almost gone, I decided to make use of the leftover turkey in a thrown together egg noodle casserole. Freshly diced onion and celery with a bit of minced garlic flavored the left over gravy-based sauce. A few dried herbs added flavor as I had no fresh herbs left after Turkey day chefing and have stayed away from the market due to our full fridge. A generous addition of freshly cracked black pepper finished the dish and we gobbled down our Thanksgiving day turkey as if we hadn't been eating it for the last 5 days.
Thursday, November 02, 2006
Thanksgiving "Covered"
It's November already and I keep thinking "what happened to 2006?" Time seems to go by much faster as you get older. I think that's because one year when you are 32 is 1/32 of your entire life, while one year when your are 6, is 1/6 of your entire life, and probably 1/4 of your memorable life so a year seems like an awfully long time.
2006, however, is not yet over and the holidays leave plenty of opportunity to make the year a memorable one. With the passing of Halloween, our thoughts turn to Thanksgiving, which for those of us who enjoy cooking, means thoughts of that perfect turkey brine from an old Bon Appetit, my mom's stuffing, and my very own homemade pie. Oh, and of course, homemade turkey gravy to top it all off. Except the pie of course, for that, we'll use homemade whipping cream. No Cool Whip allowed. Isn't that what Thanksgiving is all about? Topping it all off with real wholesome fat devoid of any commercial stabilizers or ingredients extracted from corn in a laboratory? Click on the words Cool Whip to read the ingredients. The second one is corn syrup, the third is hydrogenated vegetable oil, oh, and the first one: WATER.
If you've read this blog in the past, you'll know that I like to start my dishes from as close to scratch as possible, so when we went to the Petaluma Pumpkin Patch to scout out some jack-o-lanterns for Halloween, I picked up a Red Kuri squash, which the people at the pumpkin patch indicated would make a phenominal pie. I bought the Red Kuri squash in anticipation of finding a better alternative to pumpkin for my Thanksgiving pie. My mom's been using squash for her "pumpkin" pie for years, although I'm not sure which kind. I split the squash, seeded it, and cut it into wedges. I then peeled the skin, covered the wedges with cold, salted water in a 4 quart pot and brought it to a boil. It only took about 10 minutes of cooking before the squash was ready. I drained the wedges and kept the lid off the pot allowing the excess water to evaporate so the squash wouldn't seem water-logged. I put the squash slices in a food mill, processed it into a smooth puree and measured it for my pie recipe. Unfortunately, the pie turned out a bit more dense than I would have liked, so if I were to try it again with the Red Kuri squash, I will use slightly less of the puree. Next time, however, I'm going to try some sweet pumpkin. I'll let you know how that turns out, but we first need to eat up the squash pie.
Dense as it is, the pie seemed to be pretty tolerable with a little homemade whipping cream... No I didn't milk the cow, but I did buy some high quality Clover brand cream. It's more important than you think to have good quality cream to top your pie. For those in the bay area, Strauss is a great option as well, but a bit more expensive.
I like to make just enough topping for a few slices at a time, and I thought making whipping cream was a great excuse to get Lou in the kitchen. (He likes instant gratification.) I poured 1/2 cup of cream into a small mixing bowl, added a dash of vanilla and 1 Tablespoon of sugar, and directed my apprentice to put the beaters into the hand mixer, this time making sure they were in all the way by listening for the "click". (The first time he tried using it just a few months ago, the beaters flew right out of the mixer when he turned it on and of course he was holding it up, out of the bowl, so they flew across the kitchen.) I then instructed him to beat the whipping cream. He started beating and about 5 seconds into the process, asked me when we add the eggs. I waited a few seconds and the whipping cream told him the whole story. I indicated that was it, and Lou was amazed by the simplicity of combining three natural ingredients to make a delectable dessert topping. For those Cool-Whip users out there, I implore you-turn to the real thing this year.
2006, however, is not yet over and the holidays leave plenty of opportunity to make the year a memorable one. With the passing of Halloween, our thoughts turn to Thanksgiving, which for those of us who enjoy cooking, means thoughts of that perfect turkey brine from an old Bon Appetit, my mom's stuffing, and my very own homemade pie. Oh, and of course, homemade turkey gravy to top it all off. Except the pie of course, for that, we'll use homemade whipping cream. No Cool Whip allowed. Isn't that what Thanksgiving is all about? Topping it all off with real wholesome fat devoid of any commercial stabilizers or ingredients extracted from corn in a laboratory? Click on the words Cool Whip to read the ingredients. The second one is corn syrup, the third is hydrogenated vegetable oil, oh, and the first one: WATER.
If you've read this blog in the past, you'll know that I like to start my dishes from as close to scratch as possible, so when we went to the Petaluma Pumpkin Patch to scout out some jack-o-lanterns for Halloween, I picked up a Red Kuri squash, which the people at the pumpkin patch indicated would make a phenominal pie. I bought the Red Kuri squash in anticipation of finding a better alternative to pumpkin for my Thanksgiving pie. My mom's been using squash for her "pumpkin" pie for years, although I'm not sure which kind. I split the squash, seeded it, and cut it into wedges. I then peeled the skin, covered the wedges with cold, salted water in a 4 quart pot and brought it to a boil. It only took about 10 minutes of cooking before the squash was ready. I drained the wedges and kept the lid off the pot allowing the excess water to evaporate so the squash wouldn't seem water-logged. I put the squash slices in a food mill, processed it into a smooth puree and measured it for my pie recipe. Unfortunately, the pie turned out a bit more dense than I would have liked, so if I were to try it again with the Red Kuri squash, I will use slightly less of the puree. Next time, however, I'm going to try some sweet pumpkin. I'll let you know how that turns out, but we first need to eat up the squash pie.
Dense as it is, the pie seemed to be pretty tolerable with a little homemade whipping cream... No I didn't milk the cow, but I did buy some high quality Clover brand cream. It's more important than you think to have good quality cream to top your pie. For those in the bay area, Strauss is a great option as well, but a bit more expensive.
I like to make just enough topping for a few slices at a time, and I thought making whipping cream was a great excuse to get Lou in the kitchen. (He likes instant gratification.) I poured 1/2 cup of cream into a small mixing bowl, added a dash of vanilla and 1 Tablespoon of sugar, and directed my apprentice to put the beaters into the hand mixer, this time making sure they were in all the way by listening for the "click". (The first time he tried using it just a few months ago, the beaters flew right out of the mixer when he turned it on and of course he was holding it up, out of the bowl, so they flew across the kitchen.) I then instructed him to beat the whipping cream. He started beating and about 5 seconds into the process, asked me when we add the eggs. I waited a few seconds and the whipping cream told him the whole story. I indicated that was it, and Lou was amazed by the simplicity of combining three natural ingredients to make a delectable dessert topping. For those Cool-Whip users out there, I implore you-turn to the real thing this year.
Tuesday, October 17, 2006
The Wolfberry
I'm taking a class on Monday nights at SF City College called "Food and Culture". We make foods of a different ethnicity every week. A couple of weeks ago, our teacher passed around a small plastic bag containing a little known berry and said we could write about it for extra credit. It was called the Wolfberry. It inspired me to write the following:
Upon sight of the pale red dried Wolfberries that were passed around in class, I felt a familiarity for the specimens. I knew I had seen them before, but couldn’t recall the time or place. Upon finding them in Wikipedia and discovering that they are also know as the “Chinese Wolfberry, Duke of Argyll’s Tea Tree”, it dawned on me. I knew exactly where I had seen the nutrient rich berry- it was in the tea of so many locals I met in Shanghai on a recent trip. Most notably, a hard working older gentlemen who drove a bicycle powered rickshaw. The rickshaw must have been 50 years old and heavy in its own right. The man looked to be over 60. With the added weight of my 200 pound husband plus me (weight undisclosed), the skinny, seemingly malnourished man strained to pull us. At one point, uphill, across a busy boulevard, he had to get off his bicycle to walk the rickshaw. I wanted to get out and push, but he would not let us. I suppose it was his only way to make a buck. If he had been able to read Chinese characters, he would have taken us to the nearby silk museum, but instead, he pedaled us way across town to a silk factory. He offered to take us back after he realized that was not where we intended to go, but we couldn’t bear to see him struggle to pedal us again. Little had I known at the time about the power of the Wolf berry…perhaps I should have taken that ride.
The Wolfberry, also known as Goji berry or Tibetan Goji berry, and Frutus Lychi (as it was named on the package I bought from May Wah), can be eaten raw or cooked. It is often used in tea, as I had witnessed in Shanghai, and in soups. They are rich in nutrients such as beta-carotene, lutein, and lycopene; contains vitamins C, B1 and B2 to name a few, and contains more than 30 essential and trace minerals, antioxidants, and amino acids. It is known in Traditional Chinese Medicine to boost the immune system, eyesight, sperm production and improve circulation among other benefits.
I found the Frutus Lychi at May Wah sold by itself in the aisle with other dried foods and in packages combined with dried mushrooms, herbs and bark that appeared to be herbal elixirs. (There was a tea pot on the package showing that you needed to steep the mixture) I would have purchased one of these, but there was no way of knowing what the desired remedy was, and I feared an unwanted result. I tried adding the plain Wolfberry while steeping my green tea, but didn’t notice any obvious added flavor. When eaten, it seemed drier than a raisin with a similar fruity taste, but not nearly as sweet. Considering the nutrient content alone, I think I will continue to add the Wolfberry to my teas and perhaps at an old age I too will have the strength to pull two heavy Americans around on a rickshaw.

Here's a picture taken from the rickshaw of the poor Chinese man who struggled to pull us.
Upon sight of the pale red dried Wolfberries that were passed around in class, I felt a familiarity for the specimens. I knew I had seen them before, but couldn’t recall the time or place. Upon finding them in Wikipedia and discovering that they are also know as the “Chinese Wolfberry, Duke of Argyll’s Tea Tree”, it dawned on me. I knew exactly where I had seen the nutrient rich berry- it was in the tea of so many locals I met in Shanghai on a recent trip. Most notably, a hard working older gentlemen who drove a bicycle powered rickshaw. The rickshaw must have been 50 years old and heavy in its own right. The man looked to be over 60. With the added weight of my 200 pound husband plus me (weight undisclosed), the skinny, seemingly malnourished man strained to pull us. At one point, uphill, across a busy boulevard, he had to get off his bicycle to walk the rickshaw. I wanted to get out and push, but he would not let us. I suppose it was his only way to make a buck. If he had been able to read Chinese characters, he would have taken us to the nearby silk museum, but instead, he pedaled us way across town to a silk factory. He offered to take us back after he realized that was not where we intended to go, but we couldn’t bear to see him struggle to pedal us again. Little had I known at the time about the power of the Wolf berry…perhaps I should have taken that ride.
The Wolfberry, also known as Goji berry or Tibetan Goji berry, and Frutus Lychi (as it was named on the package I bought from May Wah), can be eaten raw or cooked. It is often used in tea, as I had witnessed in Shanghai, and in soups. They are rich in nutrients such as beta-carotene, lutein, and lycopene; contains vitamins C, B1 and B2 to name a few, and contains more than 30 essential and trace minerals, antioxidants, and amino acids. It is known in Traditional Chinese Medicine to boost the immune system, eyesight, sperm production and improve circulation among other benefits.
I found the Frutus Lychi at May Wah sold by itself in the aisle with other dried foods and in packages combined with dried mushrooms, herbs and bark that appeared to be herbal elixirs. (There was a tea pot on the package showing that you needed to steep the mixture) I would have purchased one of these, but there was no way of knowing what the desired remedy was, and I feared an unwanted result. I tried adding the plain Wolfberry while steeping my green tea, but didn’t notice any obvious added flavor. When eaten, it seemed drier than a raisin with a similar fruity taste, but not nearly as sweet. Considering the nutrient content alone, I think I will continue to add the Wolfberry to my teas and perhaps at an old age I too will have the strength to pull two heavy Americans around on a rickshaw.

Here's a picture taken from the rickshaw of the poor Chinese man who struggled to pull us.
Thursday, September 28, 2006
One Last Attempt
Lou and I made one last attempt to get more soup into the steamed pork dumplings by using another form of solidified liquid-ice. Perhaps if it had been frozen soup stock, it would have worked, but a small cube of ice seemed to dilute the flavors of the aspic too much. We also can't deny that the solid form of liquid as ice is no replacement for aspic. As we were working on consecutive buns, the ice rapidly melted in those that were waiting to be steemed, impermeating the dough of the buns and compromising their form, while aspic, which is not solid, but jelled, at refrigerator temperature, only "melts" into a liquid when heated by the steam.
While trying to solve the problem of too little liquid, we also worked on the dough itself. We determined that Yank Sing's dough was rolled to a thickness that was half that of our own. We therefore took great pains to roll our dumplings so thin they were almost transparent. The dough luckily was quite easy to work with so we had no problems with breakage. Even Lou was able to handle it with ease.
To summarize our conclusion, we like the flavors of the recipe for Shangai Steamed Soup Buns from the February, 2005 issue of Gourmet, which can be found on epicurious.com. However, the next time we make them, we will double the amount of aspic, halve the amount of the meat filling, and use less dough than prescribed for each dumpling. Then we'll roll it as thin as is humanly possible, thin and delicate enough to pop in your mouth, alowing the soup to flow.
While trying to solve the problem of too little liquid, we also worked on the dough itself. We determined that Yank Sing's dough was rolled to a thickness that was half that of our own. We therefore took great pains to roll our dumplings so thin they were almost transparent. The dough luckily was quite easy to work with so we had no problems with breakage. Even Lou was able to handle it with ease.
To summarize our conclusion, we like the flavors of the recipe for Shangai Steamed Soup Buns from the February, 2005 issue of Gourmet, which can be found on epicurious.com. However, the next time we make them, we will double the amount of aspic, halve the amount of the meat filling, and use less dough than prescribed for each dumpling. Then we'll roll it as thin as is humanly possible, thin and delicate enough to pop in your mouth, alowing the soup to flow.
Wednesday, September 27, 2006
Getting the Soup into the Buns
After our recent defeat in the Dim Sum arena, Lou and I decided we needed to invest in more R&D so we went to Yank Sing for lunch. We of course ordered two steamer baskets of the Shanghai pork dumplings and began our analysis. Immediately, we realized we just didn't have a large enough aspic to pork filling ratio. There was an abundance of broth with a very small amount of pork. I'm not sure why I didn't do the calculation earlier. Sometimes it's best to fully analyze a recipe's ratios before trying it out. In this case, the 1/2 cup of aspic, which admittedly sounded low, equates to only 1 teaspoon of broth per dumpling. (There are 8 tablespoons in 1/2 cup and 3 teaspoons in one tablespoon- 24 teaspoons for 24 dumplings) Perhaps the ratios in the Gourmet recipe I was using are authentic, but they are not adequate for what we are trying to accomplish. Yank Sing had about 2 teaspoons in each dumpling with about 1/2 the amount of pork. What to do now? Unfortunately, we mixed all of the aspic I made into the pork, so we cannot re-apportion the filling. Perhaps we can save it yet. I'll have to do some investigating.
Tuesday, September 26, 2006
Shanghai Soup-less Buns
One of our favorite places for lunch is Yank Sing and our favorite dim sum is their signature dish-Shanghai pork dumplings, also called Shanghai stuffed soup buns. They are sealed dumplings filled with seasoned ground pork and miraculously, soup that pops in your mouth when you bite into it. The key to getting the soup inside is stuffing the dough with a cube of aspic, a jelled, concentrated broth made from simmering pork and chicken bones. The aspic itself takes some time not only to cook, but also to jell, so I took the opportunity of being at home for a few hours over the weekend to make it. After 4 cups of liquid was condensed to 1/2 cup, I strained and chilled the aspic. Today, I had thought the tough part was already done in the preparation for soup buns, but I was thrown for a loop. We mixed the ground pork with the seasonings and using a method from the February, 2005 issue of Gourmet that I kept for this sole purpose, I cut up the aspic and combined it right into the pork mixture. After the tedious job of hand rolling a few of the dumplings and stuffing them with the pork and aspic, we decided to do a trial steaming of 6 of the dumplings to make sure we weren't rolling the dough too thick or putting too much or too little filling in them. A 10 minute steam revealed some beautiful, fragile dumplings that were similar in appearance to Yank Sings. We dipped them in vinegar and placed them on our tongues anticipating the signature pop of the dumpling followed by a flow of rich broth to all corners of our mouths...and there was nothing. No flavorful elixir flowed from these buns. We were both disappointed. It was a failure, but not a complete one. We still have more filling so tomorrow we plan to try using more of the pork mixture in each bun. It's all trial and error, but luckily along the way, we've got plenty to eat.
Friday, September 15, 2006
E. coli Across Eight States
The recent bagged spinach scare reminds us of the potential dangers of a centralized food supply. Tainted food could be devastating to the health of individuals not just across a few counties, but across states. According to the attached article from www.sfgate.com, so far due to this particular E. coli contamination, "Twenty people fell ill in Wisconsin. There were 11 cases in Utah, five in Oregon, four in Indiana, three each in Idaho and Michigan, two in New Mexico and one in Connecticut."
In addition to the superior taste, nutritional content, and quality of local, sustainably grown vegetables is the cleanliness of the product and the safety in knowing where and who your food came from. I think I'll buy some spinach at the farmer's market this weekend.
In addition to the superior taste, nutritional content, and quality of local, sustainably grown vegetables is the cleanliness of the product and the safety in knowing where and who your food came from. I think I'll buy some spinach at the farmer's market this weekend.
Wednesday, September 06, 2006
Breakfast Casserole
This post is for members of the Clem family who recently asked for the recipe for my breakfast casserole.
When you have friends or family in town and need a quick, filling breakfast that can be prepared ahead (in case you need to nurse a hang-over), this is it. In my own experience, I've found it also goes wonderfully well with Bloody Mary's and Mimosa's and perhaps a side of potatoes, which are also great for that "day after" kind of breakfast. It's nothing fancy, but I've found the taste and hominess of the dish makes up for what it lacks in looks. If you're looking for an eye-catcher, finish the meal with my Cinnamon Nut Coffee Cake from the August 7, 2005 posting made in a fancy bundt pan.
Like the Cinnamon Nut Coffee Cake, the breakfast casserole is a dish my mom often made, but I've embellished it with additional veggies and herbs and have adjusted the egg/milk mixture ratio. Most importantly, I use good quality aged cheese. This past weekend, I first made traditional white bread in the breadmaker for the basic casserole and used some store bought sliced wheat bread for the other. On the wheat bread variation, I added fresh spinach and basil, then sprinkled freshly grated parmesan over the vegetables and added grated Swiss cheese instead of cheddar. Here's the basic recipe, feel free to embellish as you like.
Breakfast Casserole
12 to 14 slices white bread, crusts removed
1 stick of butter, melted
6 ounces cooked ham, cubed (more or less)
6 cremini mushrooms, sliced
1/2 green or red bell pepper, diced
1/2 onion, diced
salt
fresh ground black pepper
6 ounces aged cheddar cheese, grated
6 Eggs
2 cups milk
1 teaspoon kosher salt (or 1/2 teaspoon table salt)
1 teaspoon paprika
Using a pastry brush, butter a 13X8" casserole dish with a little of the melted butter. Then, after removing the crusts from the bread, brush one side of 6 to 7 slices with the melted butter. Place the buttered side down in the casserole, in one layer, cutting the seventh piece in half if necessary to fill in on the ends. Layer the ham and then the diced vegetables over the bread. Salt and pepper the vegetables. Then sprinkle with grated cheese. On top of the filling, place the remaining 1/2 of the bread slices on one layer buttered side UP, again cutting one in half to fill in on the end of the pan if needed.
Beat the eggs with the milk, salt and paprika and poor the mixture over the bread slices. Cover the casserole with plastic wrap and place in the refrigerator over night.
The next morning, preheat the oven to 350 degrees and bake for about 40 to 45 minutes until lightly browned on top and the egg has set. Let cool slightly, then slice, serve and sit back and enjoy the company.
When you have friends or family in town and need a quick, filling breakfast that can be prepared ahead (in case you need to nurse a hang-over), this is it. In my own experience, I've found it also goes wonderfully well with Bloody Mary's and Mimosa's and perhaps a side of potatoes, which are also great for that "day after" kind of breakfast. It's nothing fancy, but I've found the taste and hominess of the dish makes up for what it lacks in looks. If you're looking for an eye-catcher, finish the meal with my Cinnamon Nut Coffee Cake from the August 7, 2005 posting made in a fancy bundt pan.
Like the Cinnamon Nut Coffee Cake, the breakfast casserole is a dish my mom often made, but I've embellished it with additional veggies and herbs and have adjusted the egg/milk mixture ratio. Most importantly, I use good quality aged cheese. This past weekend, I first made traditional white bread in the breadmaker for the basic casserole and used some store bought sliced wheat bread for the other. On the wheat bread variation, I added fresh spinach and basil, then sprinkled freshly grated parmesan over the vegetables and added grated Swiss cheese instead of cheddar. Here's the basic recipe, feel free to embellish as you like.
Breakfast Casserole
12 to 14 slices white bread, crusts removed
1 stick of butter, melted
6 ounces cooked ham, cubed (more or less)
6 cremini mushrooms, sliced
1/2 green or red bell pepper, diced
1/2 onion, diced
salt
fresh ground black pepper
6 ounces aged cheddar cheese, grated
6 Eggs
2 cups milk
1 teaspoon kosher salt (or 1/2 teaspoon table salt)
1 teaspoon paprika
Using a pastry brush, butter a 13X8" casserole dish with a little of the melted butter. Then, after removing the crusts from the bread, brush one side of 6 to 7 slices with the melted butter. Place the buttered side down in the casserole, in one layer, cutting the seventh piece in half if necessary to fill in on the ends. Layer the ham and then the diced vegetables over the bread. Salt and pepper the vegetables. Then sprinkle with grated cheese. On top of the filling, place the remaining 1/2 of the bread slices on one layer buttered side UP, again cutting one in half to fill in on the end of the pan if needed.
Beat the eggs with the milk, salt and paprika and poor the mixture over the bread slices. Cover the casserole with plastic wrap and place in the refrigerator over night.
The next morning, preheat the oven to 350 degrees and bake for about 40 to 45 minutes until lightly browned on top and the egg has set. Let cool slightly, then slice, serve and sit back and enjoy the company.
Wednesday, August 23, 2006
All Natural Graham Crackers
I love Graham crackers, especially when they are under a luscious New York style cheese cake or topped with chocolate chips and coconut. I recently wanted to buy a box to have on hand should I get the urge to make one of these treats, when I discovered on the side of a box of Honey Maids, right there in the list of ingredients, the evil, silent killer: partially hydrogenated cottonseed oil. Sure, the Trans Fats content is "0g" under the Nutrition Facts, but that just means it contains less than one half of a gram per serving. That means these graham crackers could contain up to .49 grams of trans fat per serving and still say it contains 0 grams on the nutrition label. What if I decide to have two servings? Honestly, a few crackers in the crust of a cheese cake are probably should not be a health concern considering what's sitting on top of it, but none-the-less, I have principles and I choose not to eat hydrogenated oils partially hydrogenated or not. I left the store Graham-less.
Last night, Lou mentioned he had a craving for Chippy Dippy bars. A simple, quick and easy recipe of chocolate chips and sweetened coconut sprinkled over graham crackers laid out on a backing sheet with sweetened condensed milk drizzled over it, then baked at 350 degrees until slightly browned and gooey. I reminded him I had not purchased the graham crackers as planned. He reminded me I had decided to make the crackers due to my obsession with eating all natural fats. And so I took on the challenge.
The internet is an amazing thing. In the course of an hour, I can research what the heck Graham is, find a recipe for Graham crackers and figure out how to adjust it for the ingredients I have on hand. It turns out these crackers I've refused to buy due to their ingredients were once considered a health food. They also didn't use to contain so much sugar. Back in 1830, Graham, for whom the cracker and the flour was named, was well ahead of his time, preaching (literally-he was Reverand Sylvester Graham) against refined flour.
Interestingly enough, the recipe I found had not a drop of Graham flour in it. It called for a mixture of all-purpose, whole wheat, and rye. Graham flour is a type of whole grain flour containing all of the bran and germ of the wheat. As a nod to Graham's good intentions toward healthy eating (although he sounded pretty nutty) I decided to use all whole wheat flour in place of the three flours called for. More specifically, I used white whole wheat flour, knowing that it could replace the all-purpose flour and easily replace a mixture of all-purpose and whole wheat.
Graham Crackers
2 cups white whole-wheat flour
1/2 cup sugar
1 teaspoon baking powder
1/2 teaspoon baking soda
1 teaspoon kosher salt (or 1/2 teaspoon table salt)
1/4 teaspoon ground cinnamon
1/2 cup cold unsalted butter, cubed
2 tablespoons honey
2 tablespoon molasses (I used black strap)
1/4 cup cold water
1 teaspoon vanilla extract
In the bowl of a food processor or electric stand mixer, stir together the flour, sugar, baking powder, baking soda, salt, and cinnamon. Add the cold butter and process or mix until the mixture resembles coarse meal. Add the honey, molasses, water, and vanilla. Mix until the dough comes together in a ball.
Between 2 sheets of waxed paper or plastic wrap, roll the dough 1/2-inch thick. Chill for 1 hour, until firm. Preheat the oven to 350 degrees. Dust the dough with flour and roll to 1/8-inch thickness. Cut into 2-inch squares. Arrange the crackers on parchment lined cookie sheets. With a toothpick, prick several holes in each cracker. Bake for 15 minutes, or until browned.
Based on "Homemade Graham Crackers Recipe" on About.com
Last night, Lou mentioned he had a craving for Chippy Dippy bars. A simple, quick and easy recipe of chocolate chips and sweetened coconut sprinkled over graham crackers laid out on a backing sheet with sweetened condensed milk drizzled over it, then baked at 350 degrees until slightly browned and gooey. I reminded him I had not purchased the graham crackers as planned. He reminded me I had decided to make the crackers due to my obsession with eating all natural fats. And so I took on the challenge.
The internet is an amazing thing. In the course of an hour, I can research what the heck Graham is, find a recipe for Graham crackers and figure out how to adjust it for the ingredients I have on hand. It turns out these crackers I've refused to buy due to their ingredients were once considered a health food. They also didn't use to contain so much sugar. Back in 1830, Graham, for whom the cracker and the flour was named, was well ahead of his time, preaching (literally-he was Reverand Sylvester Graham) against refined flour.
Interestingly enough, the recipe I found had not a drop of Graham flour in it. It called for a mixture of all-purpose, whole wheat, and rye. Graham flour is a type of whole grain flour containing all of the bran and germ of the wheat. As a nod to Graham's good intentions toward healthy eating (although he sounded pretty nutty) I decided to use all whole wheat flour in place of the three flours called for. More specifically, I used white whole wheat flour, knowing that it could replace the all-purpose flour and easily replace a mixture of all-purpose and whole wheat.
Graham Crackers
2 cups white whole-wheat flour
1/2 cup sugar
1 teaspoon baking powder
1/2 teaspoon baking soda
1 teaspoon kosher salt (or 1/2 teaspoon table salt)
1/4 teaspoon ground cinnamon
1/2 cup cold unsalted butter, cubed
2 tablespoons honey
2 tablespoon molasses (I used black strap)
1/4 cup cold water
1 teaspoon vanilla extract
In the bowl of a food processor or electric stand mixer, stir together the flour, sugar, baking powder, baking soda, salt, and cinnamon. Add the cold butter and process or mix until the mixture resembles coarse meal. Add the honey, molasses, water, and vanilla. Mix until the dough comes together in a ball.
Between 2 sheets of waxed paper or plastic wrap, roll the dough 1/2-inch thick. Chill for 1 hour, until firm. Preheat the oven to 350 degrees. Dust the dough with flour and roll to 1/8-inch thickness. Cut into 2-inch squares. Arrange the crackers on parchment lined cookie sheets. With a toothpick, prick several holes in each cracker. Bake for 15 minutes, or until browned.
Based on "Homemade Graham Crackers Recipe" on About.com
Sunday, August 13, 2006
Mashed Potato Maker?
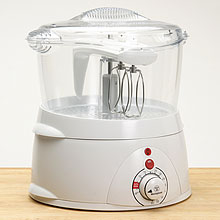
Now I've seen everything. Westinghouse seems to think that there's a need for an appliance whose sole purpose is to steam and then mash vegetables. Or, perhaps they found there really isn't a need because it's being sold for $19.99 on Smart Bargains. No wonder.
If you'd like to make fantastic mashed potatoes, don't bother buying fancy mixers or mashers. Just buy a basic hand masher, like this one at Sur La Table.

Choose good quality potatoes. I like Newman's Own Organic. Both the Russet and the Red potatoes have excellent flavor and texture when mashed. After peeling the potatoes, cut them into equal sized cubes or slices so they cook evenly and at the same rate. Then cover them with cold water in a saucepan. Salt generously with kosher salt. One teapsoon for every two potatoes should be a good ratio. We usually make 4 potatoes and use 2 teaspoons kosher salt. You can add more if needed during the mashing process.
Cover the pot and bring to a boil, then reduce heat and simmer for about 20 minutes or until fork tender. Drain well and return to pot. Place on very low heat with lid off and allow excess moisture to evaporate while mashing by hand. Add as little or as much butter as you like. We use a little extra butter for special occasions, but normally use just a couple of pats on a weeknight. Just make sure you're using REAL butter. After the butter is incorporated, add milk as needed and mix in until the potato mixture is fluffy and lump-free, that is unless you like nurdles, as they are called in our house. Salt to taste and add freshly ground white pepper as desired. Most importantly, and because it seems everyone is particular about how they like their mashers, practice this recipe a few times so you can tweak it and make them just as you like them. You'll find you can easily make your favorite mashed potatoes without any fancy contraptions.
Sunday, August 06, 2006
White Whole Wheat Chocolate Chip Cookies
Much of the whole wheat flour we buy in the store and which is used in making the whole grain breads we buy is made from red wheat. The red refers to the color of their kernel, which is reddish brown, coated with phenolic compounds. In the past year, I have been experimenting with a new find-white whole wheat flour. White is not alluding to a mixture of all-purpose and whole wheat flour, but acutally is referring to the white wheat from which it is ground. White wheat has a lower phenolic content than red wheat resulting in a kernel that is a light tan color and a flour that has a "Lighter Color, Milder Flavor" according to my bag of King Arthur. Bob's Red Mill sells it under the label of "Whole Wheat Pastry Flour".
My first experiment was to replace the half red whole wheat flour, half all-purpose flour mixture I usually used in my banana bread recipe with the white whole wheat flour. When the bread came out moist and with a mild wheat flavor that didn't mask the banana, I decided to try the white whole wheat flour in something sweeter- Chocolate chip cookies. I had attempted making whole wheat chocolate chip cookies before but the whole wheat flour I used always overpowered the vanilla flavored dough I loved and so I always came back to making my mom's recipe with good quality unbleached all-purpose flour.
So why not just use all-purspose flour? Unlike all-purpose flour, whole wheat flour contains the entire or "whole" berry and therefore retains the naturally occurring vitamins and minerals not to mention the fiber of the bran. As a general rule, less processing means greater retention of nutrients.
Mom's recipe had to be tweaked slightly by adding extra vanilla to compensate for the stronger wheat flavor, but other than that, the chewy cookies worked just fine with my change in flour. It has been suggested they are actually more satisfying than the cookies made with all-purpose flour since they are somewhat heartier and seemingly more filling.
However delicious they seemed to us, I wondered if we had developed a taste for them and if the whole wheat version of our chocolate chip cookies would be liked by sweet-toothed kids- the target market for America's favorite cookies. The kid test was passed this past week when I made them for Lou's nephews. The choosey eaters gobbled them down without any thought as to what type of flour might have been used. Here's the recipe, so you can try them for yourself. A stand mixer makes the process much easier.
White Whole Wheat Chocolate Chip Cookies
based on Mom's recipe
3/4 cup unsalted butter softened
1 cup light brown sugar
1/2 cup granulated sugar
2 large eggs
2 teaspoons vanilla
3 cups white whole wheat flour
1 1/2 teaspoons baking soda
1 teaspoon kosher salt (or 1/2 teaspoon table salt)
8 ounces semi-sweet chocolate chips (more or less as desired)
3/4 cup broken walnuts
Preheat oven to 350 degrees. Cream butter and sugars in the bowl of an electric stand mixer using the paddle attachment or in a large mixing bowl using a hand beater. Add eggs and vanilla, mix to combine. While mixer is turned off, add the flour, soda, and salt. Mix or stir to combine thoroughly. (If you're doing this by hand, it will be a great workout-this dough is stiff) Stir in chocolate chips and walnuts by hand. Scoop by tablespoons onto a parchment covered or prepared baking sheet and bake at 350 degrees for about 12 minutes or until cookies no longer feel raw to the touch. Do not brown or overbake. Cool (if you can) and enjoy!
My first experiment was to replace the half red whole wheat flour, half all-purpose flour mixture I usually used in my banana bread recipe with the white whole wheat flour. When the bread came out moist and with a mild wheat flavor that didn't mask the banana, I decided to try the white whole wheat flour in something sweeter- Chocolate chip cookies. I had attempted making whole wheat chocolate chip cookies before but the whole wheat flour I used always overpowered the vanilla flavored dough I loved and so I always came back to making my mom's recipe with good quality unbleached all-purpose flour.
So why not just use all-purspose flour? Unlike all-purpose flour, whole wheat flour contains the entire or "whole" berry and therefore retains the naturally occurring vitamins and minerals not to mention the fiber of the bran. As a general rule, less processing means greater retention of nutrients.
Mom's recipe had to be tweaked slightly by adding extra vanilla to compensate for the stronger wheat flavor, but other than that, the chewy cookies worked just fine with my change in flour. It has been suggested they are actually more satisfying than the cookies made with all-purpose flour since they are somewhat heartier and seemingly more filling.
However delicious they seemed to us, I wondered if we had developed a taste for them and if the whole wheat version of our chocolate chip cookies would be liked by sweet-toothed kids- the target market for America's favorite cookies. The kid test was passed this past week when I made them for Lou's nephews. The choosey eaters gobbled them down without any thought as to what type of flour might have been used. Here's the recipe, so you can try them for yourself. A stand mixer makes the process much easier.
White Whole Wheat Chocolate Chip Cookies
based on Mom's recipe
3/4 cup unsalted butter softened
1 cup light brown sugar
1/2 cup granulated sugar
2 large eggs
2 teaspoons vanilla
3 cups white whole wheat flour
1 1/2 teaspoons baking soda
1 teaspoon kosher salt (or 1/2 teaspoon table salt)
8 ounces semi-sweet chocolate chips (more or less as desired)
3/4 cup broken walnuts
Preheat oven to 350 degrees. Cream butter and sugars in the bowl of an electric stand mixer using the paddle attachment or in a large mixing bowl using a hand beater. Add eggs and vanilla, mix to combine. While mixer is turned off, add the flour, soda, and salt. Mix or stir to combine thoroughly. (If you're doing this by hand, it will be a great workout-this dough is stiff) Stir in chocolate chips and walnuts by hand. Scoop by tablespoons onto a parchment covered or prepared baking sheet and bake at 350 degrees for about 12 minutes or until cookies no longer feel raw to the touch. Do not brown or overbake. Cool (if you can) and enjoy!
Monday, July 24, 2006
Fresh Strawberry Topping
Growing up we often had a slice of angel food or yellow cake drowned in sweetened strawberries for dessert. At least my slices were always drowned because I was allowed to add the berry topping at my own discretion. They almost seemed unlimited as we were fortunate enough to have bushels of fresh berries picked from a patch in our mother's garden. When strawberry season was over, there was frozen berries in the freezer and what seemed like endless jars of jam.
Today I don't have my own berry patch, but I make the most of strawberry season by buying the fruit when available down at the farmer's market. This past Saturday I found some absolute jewels at Dirty Girl Produce at the Ferry Plaza. One great thing about having access to a farmer's market is you're able to buy the old varieties of strawberries that have not been engineered or cross bred to ship long distances. I shutter when I see some of the huge berries in the super market. Dry and flavorless, these often are more white then red. The Dirty Girl berries had not been toyed with. These were the small, sumptuous berries of my childhood and not a smidgeon of white flesh was found as I detopped them. It's getting late in the year, but if you run into some ruby red juicy strawberries that taste like strawberries are supposed to taste, make some cake and top it with this simple concoction.
Buy three pints of small, great tasting strawberries
Clean and detop them reserving 1/3 of them in a separate bowl (I usually reserve the most attractive ones)
Mash the 2/3 with a pastry blender or chopper. Or just pulse a couple of times in a food processor. It should be pretty chunky, just mash until the juices flow. Stir in sugar to taste. Start with 1/4 of a cup. When the sugar is dissolved, add the whole reserved berries and stir them in. Refrigerate until ready to use.
Today I don't have my own berry patch, but I make the most of strawberry season by buying the fruit when available down at the farmer's market. This past Saturday I found some absolute jewels at Dirty Girl Produce at the Ferry Plaza. One great thing about having access to a farmer's market is you're able to buy the old varieties of strawberries that have not been engineered or cross bred to ship long distances. I shutter when I see some of the huge berries in the super market. Dry and flavorless, these often are more white then red. The Dirty Girl berries had not been toyed with. These were the small, sumptuous berries of my childhood and not a smidgeon of white flesh was found as I detopped them. It's getting late in the year, but if you run into some ruby red juicy strawberries that taste like strawberries are supposed to taste, make some cake and top it with this simple concoction.
Buy three pints of small, great tasting strawberries
Clean and detop them reserving 1/3 of them in a separate bowl (I usually reserve the most attractive ones)
Mash the 2/3 with a pastry blender or chopper. Or just pulse a couple of times in a food processor. It should be pretty chunky, just mash until the juices flow. Stir in sugar to taste. Start with 1/4 of a cup. When the sugar is dissolved, add the whole reserved berries and stir them in. Refrigerate until ready to use.
Thursday, July 06, 2006
Sushi at Home
Attempting to make sushi at home can be a daunting undertaking, but once you practice it a few times, it really sticks-literally. Contrary to popular belief, sushi does not mean raw fish, it actually refers to food made with vinegared rice, or sumeshi. Correctly seasoned sumeshi is the key to good flavored sushi. I've found great results by following the guidance of Emi Kazuko in her book, Easy Sushi. I use a rice cooker to cook the short grained Japanese rice and then follow her technique of folding the seasoned rice vinegar into the just-cooked short grain rice as it cools to body temperature. Next thing you know, the rice is sticky but not mushy. The individual grains seem to be coated with glue.
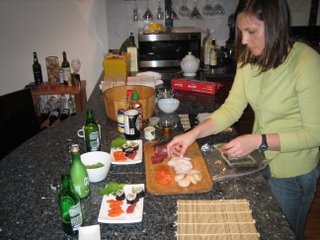
With a foundation of well made sumeshi and a bamboo roller, you can tackle making your favorite sushi rolls. Just julien (cut into matchsticks) a variety of vegetables such as cucumber, avocado, and green onions. Thinly slice fresh herbs such as japanese shiso leaves or thai basil, then cook some shrimp, slice some raw fish, and set it all out for everyone to create their own favorite combinations. This is a great way to get friends and family involved in making dinner. Honestly, this is about the only thing Lou makes besides tuna melts and burritos, so it's worth a little preparation for some quality time in the kitchen.
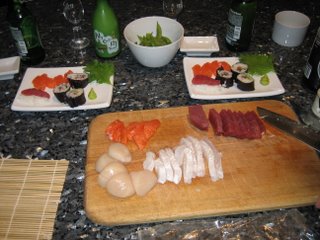
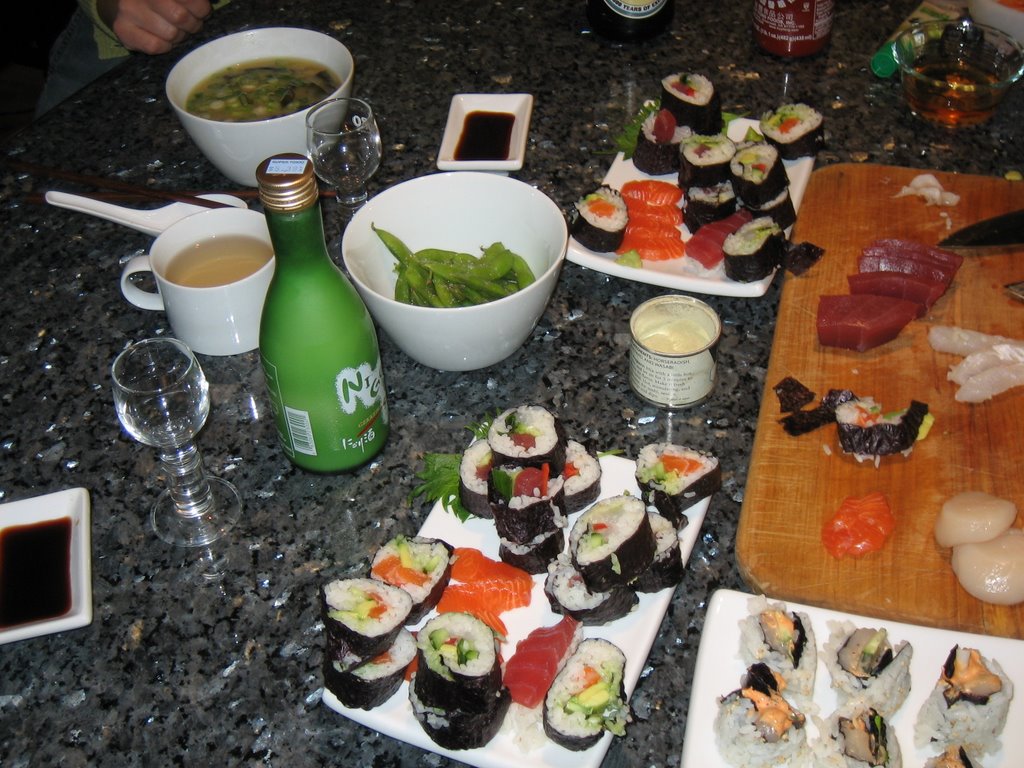
As you can see, a little fish goes a long way. We were stuffed after the miso soup, edamame, sashimi, and all our favorite sushi rolls topped off with some unfiltered sake. Next time, we'll invite some friends.
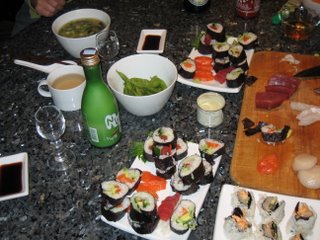
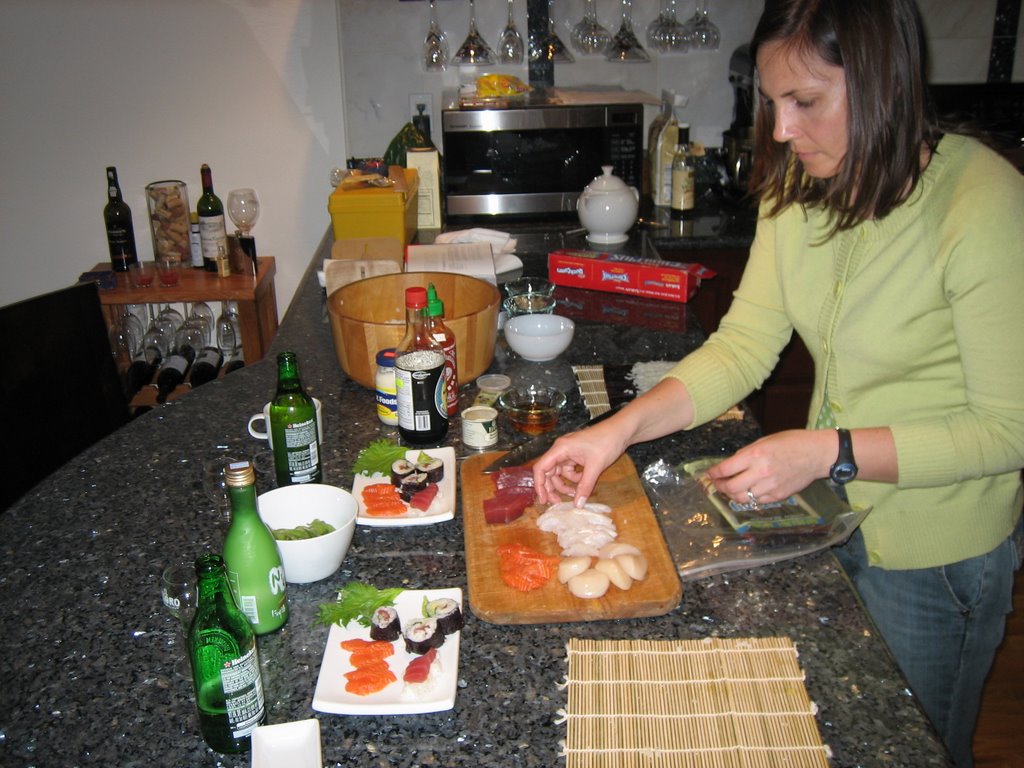
With a foundation of well made sumeshi and a bamboo roller, you can tackle making your favorite sushi rolls. Just julien (cut into matchsticks) a variety of vegetables such as cucumber, avocado, and green onions. Thinly slice fresh herbs such as japanese shiso leaves or thai basil, then cook some shrimp, slice some raw fish, and set it all out for everyone to create their own favorite combinations. This is a great way to get friends and family involved in making dinner. Honestly, this is about the only thing Lou makes besides tuna melts and burritos, so it's worth a little preparation for some quality time in the kitchen.

As you can see, a little fish goes a long way. We were stuffed after the miso soup, edamame, sashimi, and all our favorite sushi rolls topped off with some unfiltered sake. Next time, we'll invite some friends.
Subscribe to:
Posts (Atom)